Labels

Attic (4) Baking (14) Bird Bottles (3) Books (1) Buttons (2) Challenges (5) Chuckles (3) Cleaning (1) Confessions (6) Cooking (23) Critters (12) Decorating (1) Fabric (3) Fall (5) Freebies (3) Holidays (23) Kitchen (2) Meal Planning (6) Organizing (6) Parenting (2) Pumpkin (5) Quilt Camp (2) Quilt Guild (3) Quilting (11) Rainbows (2) Recipes (14) Saving Money (17) Scrap Bins (3) Sewing (8) Sewing Room (12) Spring (10) Summer (7) Tuesday Tips (14) Tutorials (3) Vacation (8) Winter (1)
Showing posts with label Cooking. Show all posts

Wednesday, May 22, 2013

The Yolk's on Me!

How could I have been cooking for 30 years without seeing a double-yolk egg? This one went into my mac and cheese tonight, but I would never have used it in baking because it would most likely alter the recipe results.


I always break my eggs into a small dish or measuring cup, instead of directly into other ingredients, primarily to prevent shell fragments from getting mixed in. (And because I have to poke around with a fork to remove the little white strand attached to the yolk, which may or may not be the umbilical cord, but creeps me out anyway.) Some recommend it in case you happen to get a rotten egg (I never have!) Now, I'm thinking the possibility of an extra yolk might be another good reason for doing it, since it could ruin a whole batch of batter.   

Have you ever cracked an egg and found more than one yolk? Do you break your eggs into a separate bowl?

You can read more about multiple-yolk eggs here. There's even a picture of one with four yolks! Apparently, the chances of a double yolk are about one in 1,000. But most are discovered in the production process and used in other egg products rather than being sold as whole eggs.  These two were inseparable, but there are many images online showing distinctly unattached yolks.

Tuesday, February 12, 2013

How Fresh Are My Eggs? (Tuesday Tips: Kitchen Edition)


Once eggs are out of the carton and in the rack on the fridge door, how do we remember how long they've been there? How long do they last once we've purchased them, anyway? I've been thinking about this since I read in one of my vintage cookbooks that a "good egg" will sink and a "bad egg" will float. I wanted to know more...

How to test an egg for freshness


Place an egg in a cup with enough water to cover it completely.
  • If the egg sinks to the bottom and lies on its side, it's very fresh.
  • If it stands upright on the bottom, it's still safe, but should be eaten soon.
  • If it floats, it should be discarded.
(Once an egg is washed, its protective coating has been removed and it should be cooked to prevent contamination). 

The science behind the test

I learned that an egg is porous. Its freshness and shelf life are determined by the amount of air that has entered the shell. So an egg that floats has taken on quite a bit of air and is no longer good to eat.

What, exactly, is wrong with a "bad egg"?

A pasteurized egg stored in your refrigerator should not grow bacteria. But it will lose moisture as it takes on air and dry out, rendering it "the incredible, inedible egg". 

What's going on between "very fresh" and "should be eaten soon"?

Apparently, the freshest egg has a well-shaped and properly placed yolk. So only the freshest eggs should be poached or boiled for deviled eggs, while those that have aged a bit would be better scrambled or mixed into a recipe.

The life cycle of a store-bought egg

According to the USDA, farmers must deliver their eggs to stores within 30 days after they're laid. The grocery store must sell them within 30 days, so this is the date usually marked on the carton as the "SELL BY" date. It is recommended that you use them within five weeks of that date.

So the good news is that our eggs have greater longevity than I thought. The bad news, I guess, is that they could be two months old before we even purchase them!

More posts about eggs: 

Devilishly Delicious - my favorite deviled egg recipes
Egg Yolk Cookie Paint - cookie decorating fun
Easter Eggs - decorating eggs with shrink wrappers

What's your favorite way with eggs?


Tuesday, January 22, 2013

Cooking Veggies (Tuesday Tips: Kitchen Edition)


Tuesday Tips are back, and we're covering the kitchen - until I run out of material or tire of the topic, whichever comes first.

Covered or Uncovered?

Should you use a lid on the pan when cooking veggies? 


According to one of my vintage community cookbooks, old-fashioned wisdom dictates that any vegetable grown underground (carrots, beets, potatoes...) should be cooked covered.


Veggies that grow above ground (peas, beans, greens...) should remain uncovered. Further research leads me to believe that this helps retain the bright color of your green vegetables (all of which, of course, grow above ground).

Of course, if you're one of those city slickers who's not sure which veggies grow where, this isn't going to be very helpful advice, is it? I once witnessed a "sandwich artist" at Subway stumble over a vegetarian customer's request for a sub with "everything that grows in the ground" -so you might surprised what some people don't know about their food! 

Cold or Boiling Water?

Apparently, those who came (and cooked) before us also knew that the root veggies should start off in cold water, while those grown above ground should be placed in water that is already boiling.

How could I have cooked for thirty years (and read cookbooks and homemaking magazines for longer than that) and not learned that? 

Do you have a veggie-cooking tip to share?

Thursday, January 17, 2013

Freezing Leftover Tomato Paste


Ever since this post about freezing things other than water in ice cube trays, I have been obsessively doing just that! I have zipper baggies of half and half cubes, several varieties of broth cubes, and fruit juice cubes. No leftover wine cubes yet- only because I am still trying to figure out what leftover wine is.

In the past week I've made two dishes with tomato paste, each using about a tablespoon. I understand it should last about a week in a sealed container in the fridge. Since I have no tomato paste plans for the near future (and detest food waste), I decided to try the ice cube thing.

If you've tried this, you're laughing at me right now. Because you already know that putting tomato paste into an ice tray is a very messy procedure. What was I thinking?


Dollop Method of Freezing Tomato Paste


Then I remembered reading somewhere that you could place dollops, approximately one tablespoon each (you'll see why I say approximately when you try it...), onto a piece of freezer paper and freeze until firm. Then you put the frozen lumps in a freezer bag and pull them out as you need them. Each tablespoon is about a half an ounce of paste.


Martha's Method of Freezing Tomato Paste


I also ran across Martha Stewart's method, whereby you freeze it in the can and cut into slices.

Since I'm the Home Ec Dropout, and not Martha Stewart, I chose to freeze it into sloppy little dollops. Maybe not as pretty, but just as frozen and safe from spoilage!

How to Avoid Having to Freeze Tomato Paste...


I've recently learned that tomato paste is sold in a tube, sort of like toothpaste. I think I'll check it out next time I shop for groceries! If it's not cost prohibitive, that sounds like great alternative.  


How do you deal with leftover tomato paste? Or do you manage not to have any? Either way, I'd love to hear about it.

Sunday, January 13, 2013

Replacing Butter with Olive Oil


I've often wondered in what ways butter, oil and shortening are interchangeable (this spelling always looks wrong to me, but it's right) in baking and recipes. The only time I have felt comfortable experimenting is in sauteeing. I still don't know all the answers, but last time I visited Oliveto to taste (any buy) some interesting oils and vinegars I was offered one piece of the puzzle:

Butter to Olive Oil Conversion Chart

Butter/Margarine =   Olive Oil
1 teaspoon               3/4 teaspoon
1 tablespoon            2 1/4 teaspoons
2 tablespoons           1 1/2 tablespoons
1/4 cup                    3 tablespoons
1/3 cup                     1/4 cup
1/2 cup                     1/4 cup + 2 tablespoons
2/3 cup                     1/2 cup
3/4 cup                     1/2 cup + 1 tablespoon
1 cup                           3/4 cup  

I plan to experiment with this a little. I also thought about replacing the vegetable oil in my Cranberry Pumpkin Bread with walnut oil to see how it changes the flavor. (My understanding is that any oil -nut, vegetable, olive, etc.- can be exchanged measure for measure.)

Has anyone tried replacing butter with oil in a recipe? How did it turn out?

Thursday, January 3, 2013

Trying Two New Recipes


Steve's friend came over to visit, leaving me with the whole afternoon to cook! Only three days into my New Year's Resolution, I'm starting to think it's more about actually getting into the kitchen and cooking ahead more than it is about planning. I've always had plenty of plans- and plenty of trouble following through with them.  I may change my little graphic to "What's Cookin' in 2013?".

Spicy Bean and Lentil Loaf


I copied this recipe from a friend's vegetarian cookbook. There's no sense in giving you the recipe since, as usual, I changed a few things. It was very similar to this vegetarian meatloaf, except that I used no protein substitute- just beans and lentils. I wasn't really trying to replicate meatloaf. I'm not vegetarian and could've made a meatloaf. It's just that I like Morningstar Farms Spicy Black Bean Burgers, so I thought I might like this. If it turns out well, and I make it again to refine the recipe, I'll share it.

Veggie Stuffed Pasta Shells

On my list for this week was Veggie Stuffed Pasta Shells, loosely based on this recipe. I wanted to use the whole box of shells, so I planned on using the whole container of ricotta to increase the volume of the filling, and adding a bag of frozen spinach (thawed and squeezed very dry). Also, I like to use the whole jar of spaghetti sauce, lilke I do for my Pumpkin-Ricotta Stuffed Shells.

What I didn't plan on was forgetting to buy the pasta shells. So I dropped by a store I normally don't shop in (because I hate because they never have what I want), which didn't even have jumbo pasta shells. So I'm thinking I'm not leaving the store without something. I buy manicotti shells. Same thing, right? Wrong.

First of all, the fragile lilttle things practically come wrapped in bubble wrap! This scared me- I mean, I've even had problems with the pasta shells! Secondly, you're supposed to pipe the filling in with a pastry-icing-squeezer-thingy, which I have. But guess what? This filling is really chunky, so it won't work. (No, I didn't try- I figured it out first...)


So I took a deep breath and cooked the manicotti. They all survived the boiling, but they split a little, since they're ribbed. A few of them actually worked, but as I tried to stuff the stuffing in, some ripped further. So I opened those up and stuffed them like hot dog buns.

This is what it looked like before going into the oven. I think it'll be okey-dokey. It's not for company or anything, after all.


By the way, I love my new OXO Julienne Peeler. It came in a set along with a regular peeler and a serrated one for tomatoes and other soft fruits and veggies (haven't tried that one yet). Look what it did for my zucchini and carrots!


The veggie-stuffed manicotti just came out of the oven:


A sprinkling of shredded Parmesan cheese near the end of baking hides a multitude of sins! If this turns out to be a good recipe, I'll send you this one, too. If not, at least you know not to buy manicotti shells!

This cooking day should take us through the weekend and keep us out of restaurants. If we decide to eat out, it'll be because we want to, not because we have to!

Tuesday, January 1, 2013

Off to a Good Start


I've made New Year's Resolutions before that didn't last through the first day. But this one's important to me because it benefits my whole family. Not to mention that I've made it in public, in writing, online.  

Tonight's dinner (planned on the way home from errands- anytime before I drive up the driveway counts as planned): 

  • mashed potatoes (freshly made, leftovers will be potato cakes for breakfast tomorrow)
  • corn (frozen)
  • peas (frozen)
  • cranberry sauce (leftover)
  • gravy (turkey stock cubes w/ spices and cornstarch)


Cooked for the next two days:

  • lentils
  • rice (2/3 basmati, 1/3 sweet black, in chicken broth)


Later in the week, we're trying a new recipe: Veggie Stuffed Shells! Well, it's actually goin to be manicotti, because the store was out of jumbo pasta shells. It's not an obstacle, it's an opportunity to try something new. At least that's what I keep telling myself...

I think that'll take care of Week 1. How's your resolution going so far?

Friday, December 28, 2012

My New Year's Resolution


My family likes home-cooking. We want to eat food we like that's good for us. We're tired of eating fast food and pizza because I forgot to plan a meal and it's getting late, and we're sick of over-paying for mediocre food served by people who don't deserve the title of "server". We usually eat at home at least five nights a week, but we're definitely in a rut! Meals feel thrown-together and boring.

Our last restaurant meal began with sticky menus and ended with a $30 bill for two gourmet sandwiches with chips, a basket of soggy fries, and a kid's mac and cheese meal. On the way home, I mentioned that I could've made a wide range of delicious home-cooked meals for three (with leftovers) within that price range. As an added benefit, we'd even know what was in it, and under what conditions it was prepared. The next question was: Why aren't we doing it? That's when we decided.

For 2013, we're moving most of our restaurant budget into our grocery budget to upgrade our grocery purchases. Restaurant meals will be reserved for special occasions and when we can't be home for dinner.

A professor-friend touts the 5 P's: Proper Preparation Prevents Poor Performance! I think that's the key to good family dinners. So this week, I'm eagerly digging through my recipes, new and tried-and-true. We're all excited about trying some new ones and revisiting old forgotten favorites, shaking up our dinner routine, and eating better than ever!

I'll share what I'm learning and doing as we go along. Please join me in making 2013 a Year of Meal Planning!

Wednesday, November 28, 2012

Who Knew You Really Needed a Turkey Baster and a Skimmer?


The turkey baster (on the left) is good for - well, you know - basting your turkey. I can't believe I've cooked almost 30 years worth of poultry without one. I guess you can teach an old dog new tricks!

I got mine from WalMart for under 2 bucks, but this one's awfully cute, isn't it?


The skimmer's role at Thanksgiving is not quite as obvious, but no less useful. I grabbed it at the international market because I'd read that it would easily skim (hence the name skimmer) the scum from the turkey broth you make from your Thanksgiving carcass. It did, and without clogging up like the mesh ones I have used before! What a breakthrough... 

I also used my new toy to scoop sweet pepper strips from the saute pan, which is its more intended use, I guess. Much better than the slotted serving spoon I'd been using for jobs like this.


The peppers went into small freezer containers and the cooking broth was frozen into cubes for later use!

What new kitchen gadgets have you recently discovered?


Monday, November 26, 2012

Does Pasture-Raised Turkey Taste Better?

I've always wondered. 


This year I got a chance to compare, since we had the opportunity to eat a pasture-raised turkey on Thanksgving Day followed by our own turkey dinner on Friday. The free-range turkey was delivered fresh and cost over $4 per pound. I think I paid about $1.29 per pound for our frozen Butterball. So this allows us to compare fresh with frozen, as well.

My family said they couldn't detect a significant difference in taste between the two birds. Both were roasted in bags and were incredibly delicious and moist.

So, for over three times the price, the value (in our opinions) would only be in the pleasure or satisfaction you may receive from knowing your turkey's provenance. If how your turkey as treated when it was alive is important to you, or you're worried about what it may have been fed or injected with, then you may feel that a pasture-raised, organic turkey is worth the price differential. However,if taste and budget are your criteria, I say go with the Butterball and use the extra money buy the rest of dinner plus dessert and drinks! 

But if it is important to you to eat locally and you have a strong environmental concerns, by all means follow your conscience. After all, money isn't everything! 

Sunday, November 25, 2012

Does Marinating a Turkey Make a Difference?: My Rum and Dr. Pepper Experiment


Jack's Instructions


My friend Jack's very specific instructions for marinating my 20-pound turkey were as follows:

Mix a fifth of Captain Morgan Original Spiced Rum with a 2-liter bottle of Dr. Pepper and marinate your turkey in it for 12 hours.

Upon further questioning, I was able to extract this additional advice:


Make sure to baste your turkey or it will get too dry as the alcohol burns off.


How I Actually Did It


So I set out to clarify how to marinate a turkey by consulting my other friend, Google, who elaborated enough through a few different sources to help me piece together the marinating process for such a huge piece of poultry.

Here are the basic steps I followed (Google is there for you, too, if you need more information)  Mine turned out well, but I am by no means a detailed recipe writer yet. These instructions would probably be enough for an experienced cook, but may not suffice for a novice! Anyway, it's more than Jack gave me, right?:

1. I mixed together 2 liters of Dr. Pepper and 750 mililiters of Captain Morgan Original Spiced Rum ) less the little bit that accidentally spilled into the glass of ice I had sitting on the counter...) in my large, covered, stainless steel roasting pan. It smelled great already. Tasted good, too.

2. I removed the giblets and neck from the cavities of the turkey (this is important whether you're marinating or not!).

3. I rinsed the turkey, but didn't bother to dry it off, since I was planning to plunge it into a liquid. (I read that you could also marinate the turkey in a cooking bag- similar to the way you marinate chicken breasts in a baggie. One person who did it that way placed it in her crisper drawer to marinate.)

4. I placed the turkey, breast side down, into the marinade, covered the pan, and put it in the fridge for about 12 hours.

5. Then, I turned the turkey over and let it marinate on that side for about 8 hours. Since I had read that marinating time should be 12-36 hours, and I figured the breast was the most important area, I marinated for the last 4 hours on the breast side again. NOTE: Each time I flipped it, I marinated the top side of the turkey, using my new turkey baster- just to try it out!

6. I seasoned the turkey inside and out with salt and pepper, then placed it in a cooking bag like I always do. I poured the marinade into a pitcher and ashed and dried the roasting pan before placing the turkey (in the bag) in it. When I use a bag, I do not place the cover on the pan. In this case, the turkey was too large for the lid anyway! (I have since read that one should rinse the turkey again after marinating, but before cooking. Not sure why...)

7. I set the oven to 325 degrees on convection roast, and the timer for 4.5 hours.

8. Per Jack's instructions, I opened the bag after an hour to baste the turkey with its own juices that were collecting in the bottom of the bag. By then, it was already getting quite brown in some areas, so I placed aluminum foil over a few spots and reclosed the bag. I checked and basted at the second, third and fourth hour marks, too.

9. Once the temperature was right according to the instant-read thermometer, I let it rest out on the counter for 20 minutes before carving (or mutilating, in my case!).


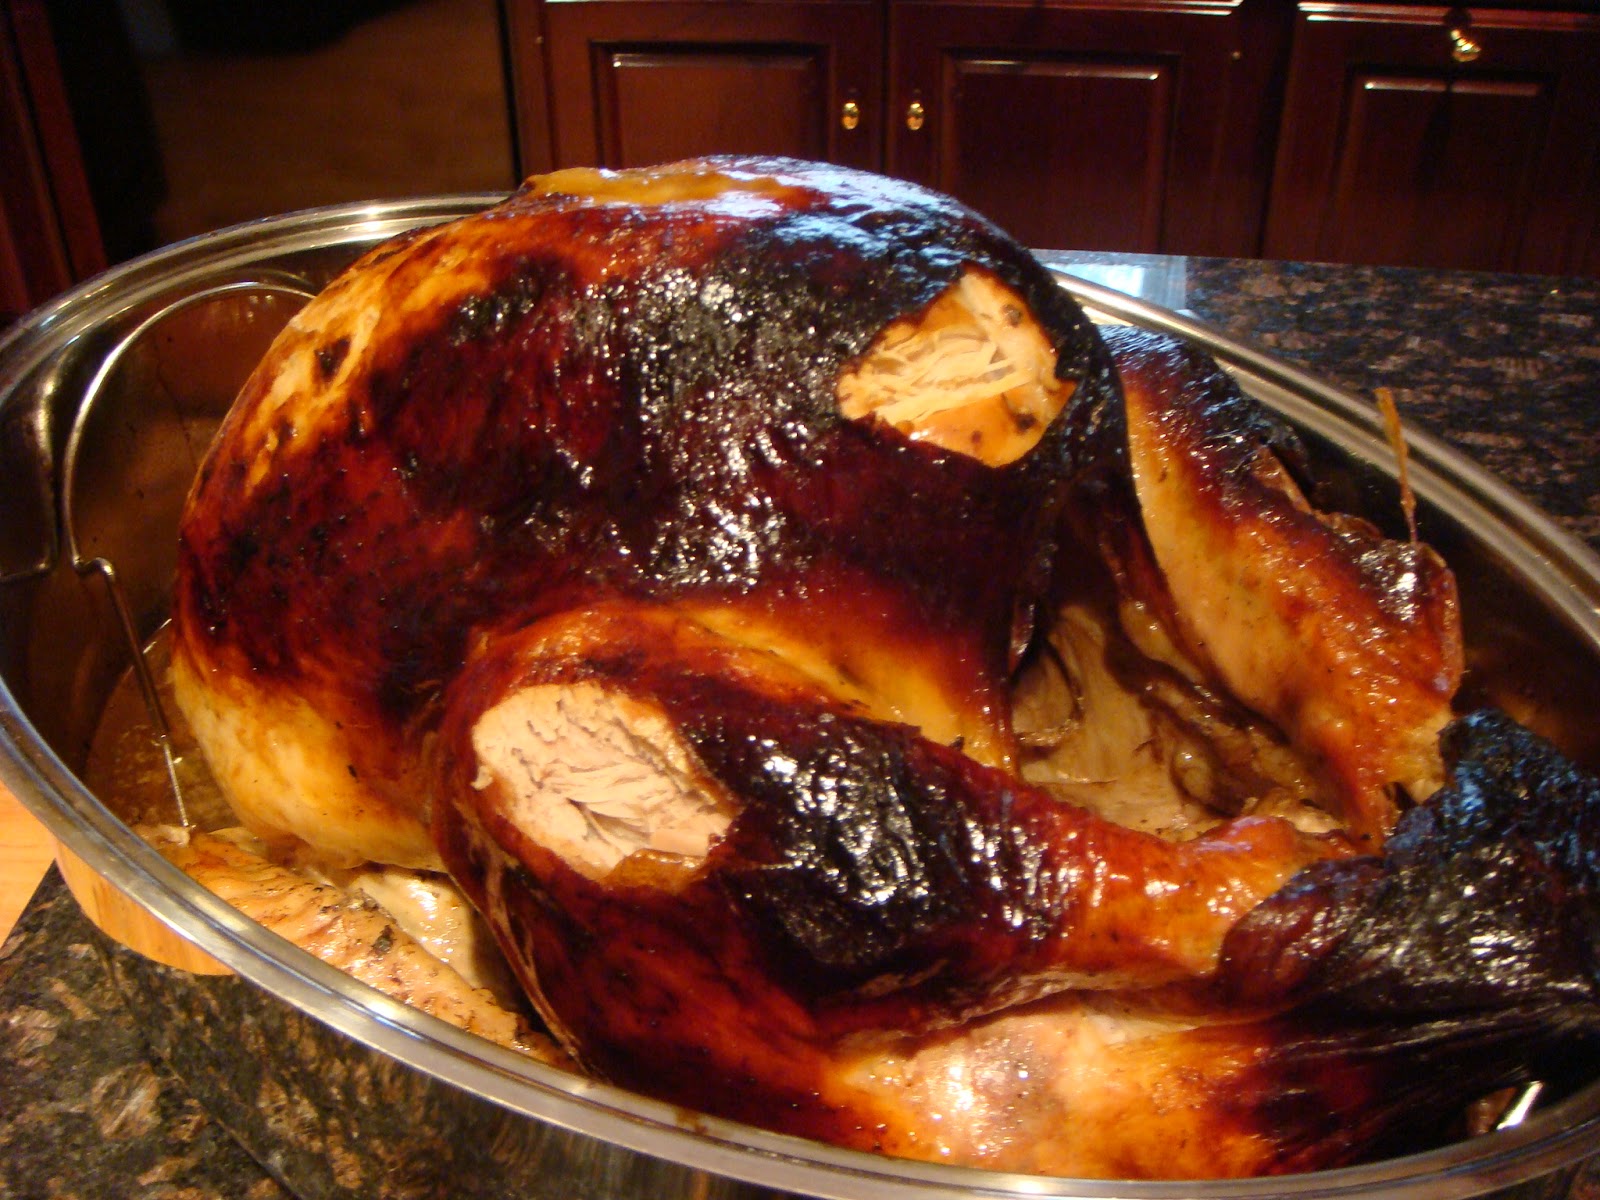
Here's how it turned out. 

The missing pieces were the results of my "taste testing" prior to carving.


I think the meat was moister and a bit sweeter with the marinade than with regular roasting. And you can see it browned a little more than usual. Next time, I would cover it sooner. The one thing I'm not sure about is whether it was actually the marinating or the basting that made the difference! I didn't realize that I was actually changing two variables in this little experiment.


Making a Glaze From Marinade


I wasn't sure it was worth the extra twenty dollars or so for this preparation, until I tasted the glaze I made with the leftover marinade. So deliciously sweet and sticky to drizzle over the turkey like gravy! Today at lunch, I spread some of it cold on my leftover turkey sandwich. It was about the consistency of honey, and every bit as sweet!

I had always heard that liquids used to marinate poultry or meat had to be discarded, but I  really wanted to make a glaze after my husband commented that it would be great if the rum and soda were a sticky glaze! So my friend Google came to my aid once again, convincing me that it is safe to use the marinade, either as a sauce or for "mopping" on the grill if it is boiled first for several minutes. (Please*do*not*take*my*word*on*this, since I am not an expert (quite to the contrary- I'm the Home Ec Dropout... *Do*your*own*research!)

Anyway, I poured the marinade in a 3- quart saucepan (the amount left was about 2 liters), boiled it for about 10 minutes, strained it to remove little bits of icky turkey stuff that had formed, and transferred to a 2-quart saucepan. Then I added a cup of brown sugar and reduced the mixture to between 1 and 2 cups (I didn't measure it) by simmering over low heat. I forgot to time it, but I believe it took at least an hour. It was so delicious, it makes me want to try more reductions- maybe red wine is next!

My daughter said the turkey may not have been that much better, but the sauce was definitely worth twenty dollars! I agree.

Friday, November 2, 2012

Julie & Julia


I just finished reading Julie & Julia by Julie Powell. What a departure from the movie, which I thought was absolutely delightful. I'm glad I read it because it offered a more realistic account of her experiences with cooking all 524 recipes from Mastering the Art of French Cooking by Julia Child... in one year! And blogged about it every step of the way !What surprises me now is the casting of the seemingly sweet Amy Adams, who portrayed  Julie as a cute, giggly, adventurous, though slightly skeptical gal! Having read the book, I'm thinking maybe Amy Pohler would've been a better choice. Of course, Meryl Streep was fabulous (even better than Dan Aykroyd) as Julia.

Anyway, I enjoyed both the book and movie, and am completely intrigued and inspired by the Julie/Julia project! However, I'm certainly not up to cooking kidneys, liver, gizzards, or any manner of aspic. And no one in my family would touch that crap with a ten-foot pole, including me.

I was talking to Mabz about this and she said, "Mommy, why don't you bake your way through the Christmas Cookies book?"

Now, that I think I could manage.

What cookbook would you like to cook and eat your way through?

Tuesday, October 30, 2012

Perfectly Toasted Pumpkin Seeds


Every year I toast the pumpkin seeds from our jack-o-lantern. And every year I don't like the way they turn out- usually burnt. Until this year! I present to you my process, arrived at through much trial and error, for:

Perfectly Toasted Pumpkin Seeds


What you need:
rimmed metal baking sheet or pan
seeds from 1 pumpkin (probably somewhere between 1 and 2 cups)
olive oil
salt

Here's what I did:

1. I did not bother to rinse my pumpkin seeds. I just picked out the really big pieces and left most of the little stringy stuff. As someone else suggested, a little pumpkin goo never hurt anybody, and adds even more flavor. It dries up when you bake the seeds.

2. I read somewhere that it would be a good idea to spread out the seeds in a single layer to dry overnight. So I did. This seemed preferable to boiling the seeds in salty water prior to baking, as another website suggested. Both methods claim to make them easier to eat if you plan to eat the entire seed rather than cracking it open to get just the tender kernel inside.  I really don't think I'd go to all this trouble for a few tiny morsels.

3. When you're ready to roast, toss the seeds with 1 or 2 tablespoons of olive oil (in my failed attempts I used regular vegetable oil) and salt to taste.

4. Place on a greased rimmed metal baking sheet or pan in a single layer.

5. Preheat your oven to 300 degrees and bake until the seeds are lightly browned and fragrant.

For how long, you ask? 
I think this is the important part:

6. Depended on how many seeds you're toasting, how thick or thin your seeds are, how dark your baking pan is, how well your oven is calibrated, how much oil you used, and Lord knows how many other factors, this will probably take between 10 and 30 minutes (some say up to 45). I wouldn't believe any recipe or chef who presumes to give you an exact time. Mine took 20 minutes. About half-way through I took them out, shook the pan, and tasted one to check their progress. When they're done: they smell delicious, appear nicely browned, and taste crispy but are easy to bite into and chew. Sort of like an APGAR score for pumpkin seeds!

I think you can store these in an airtight container for about a week, but you won't need to!

And just to prove I'm a gourmet, the wine pairing for Perfectly Toasted Pumpkin Seeds is Lucky Duck Riesling ($3 a bottle at WalMart).
_______________________________________

CRAZY WEATHER, INDEED

Sandy didn't mess with us much here in the New River Valley, but it's just not right to wake up to snow on the day before Halloween!

Snow on the ground, leaves still on the trees... What the...?


Thursday, October 18, 2012

Pumpkin-Ricotta Stuffed Shells

I discovered this recipe last fall, and was thrilled to share it with my sewing friend, Allison. She looked it over and started asking questions-

Allison: Where did you get fresh basil and sage?
ME: I didn't. I used a few dried herbs from my cabinet.
Allison: Did you get the pecorino Romano from Kroger?
ME: No, I used the Parmesan cheese in the shaker canister.
Allison: I thought Steve didn't like garlic.
ME: He doesn't, so I left it out. But I snuck in a little garlic powder.

You get the idea. So, I am pleased to pass this family favorite along to you, with my adaptations in italics.


Pumpkin-Ricotta Stuffed Shells
Country Living/ October 2011

24 jumbo pasta shells (cook the whole box, they don't all survive intact!) 
1 tablespoon extra-virgin olive oil (I didn't use this, although it probably keeps them moister)
22 ounces (2 1/2 cups)  fat-free ricotta (my container was a few ounces more, but I used the whole thing)
1 (15 ounce) can pumpkin puree (I have used both puree and solid pack pumpkin, which is easier to find at the store. Both work.) 
2 1/2 ounces (3/4 cup plus 2 tablespoons)pecorino Romano, grated (I used grated parmesan from the shaker canister)
1 large egg white
2 garlic cloves, minced (I substituted a little garlic powder)
1 cup fresh basil and 1 tablespoon finely chopped fresh sage (I used 1 teaspoon each of dried thyme, basil, parsley and marjoram instead)
1 teaspoon salt
1 teaspoon freshly ground pepper
1 (26 ounce) jar store-bought tomato sauce (I used a 24 ounce can of Hunt's Four Cheese spaghetti sauce)

1. Cook pasta shells according to package instructions; drain. Transfer to a baking sheet and drizzle with oil. Set aside and let cool.
2. Meanwhile, in a medium bowl, stir together ricotta, pumpkin, 3/4 cup of pecorino Romano, and remaining ingredients, except tomato sauce.
3. Preheat oven to 350. Spread sauce in bottom of 9x13" baking dish. Fill each pasta shell with about 3 tablespoons ricotta-pumpkin mixture and arrange in pan. Cover pan with foil and bake for 30 minutes.  Remove foil, sprinkle with remaining pecorino, and bake for 15 minutes more. (If desired, stuff shells the night before and refrigerate overnight in an airtight container, in between layers of plastic wrap; arrange shells on sauce right before baking.) This might be where the drizzle of olive oil would come in handy.

I refrigerate what's left over and microwave future servings as needed. It's just as delicious the second (and third) time around.

If you are intimidated by the idea of stuffing the shells, don't be! I was, too, but if I can do it I know you can. Figure out how 3 tablespoons of filling relates to a 1/4 cup measuring cup, and use that- it's easier than spooning out 3 separate tablespoons each time. Hold the shell in your palm, propping it open with your thumb and forefinger. Fill it with the measuring cup in the other hand. Since my larger container of ricotta makes a bit of extra filling, I am usually able to generously stuff about 28 shells, which is about how many usually don't fall apart before I can get them stuffed. 

For another great pumpkin treat, try my favorite Cranberry-Pumpkin Bread recipe. 

Be on the lookout for my upcoming experiments with Parmesan Pumpkin pasta sauce!


Monday, October 1, 2012

Autumn Colors, Peppers & Cooking with Pumpkin

Autumn Colors

The first sign of fall in our yard is always the beautiful color of my favorite sugar maple:


The burning bushes are also turning red:


And there are acorns... EVERYWHERE!


Colorful Mini Peppers

 Our favorite thing in the fridge this week is these tiny colorful (and tasty) peppers we found at the grocery store:


Green bell peppers are always around, but I love these little red, yellow and orange ones. So far, we've eaten them sliced in rings and dipped in ranch dressing, diced in salads, chopped up in egg salad, and stir-fried along with a bag of frozen veggie mix. So delicious! Read a little more about peppers here at The City Cook.

Cooking With Pumpkin

We stocked up on canned of pumpkin, too, as we always do this time of year. One of my favorite recipes for fall is Pumpkin Stuffed Shells, which I'll share later this month.

While browsing the Williams-Sonoma store in Colonial Williamsburg last weekend, my husband picked up a little $12 bag of pumpkin spice bread mix and asked, "why don't you get us this? We love pumpkin bread." Well, I love it, too, but I'm not paying that much for it! I think you even had to add some ingredients. So I promised to make some from one of my tried-and-true recipes as soon as I had a chance to buy some pumpkin. Now I have the pumpkin, so I have to make good on my promise. Stay tuned for an upcoming recipe.

Also, a jar of Pumpkin Parmesan Pasta Sauce caught my eye. I was the only one who thought it sounded good, but I thought $16.95 for a pint of sauce was a little steep. So I'm standing there reading the label, trying to figure out how to make some myself. Steve, in typical Steve-fashion, expressed his opinion that I would never be able to duplicate it, so I might as well just buy it. In typical me-fashion, I took that as "permission" to spend $16.95 on a jar of pasta sauce, and rationalized that once I tasted it, and had the ingredient list on the back of the jar, I could make a reasonable facsimile and eat it all the time for just a fraction of that cost. So now I'm kind of committed to coming up with a recipe for my own Pumpkin Parmesan Pasta Sauce. That is, if it actually tastes good... but how could it not... pumpkin... parmesan... pasta... sauce. Everything yummy all rolled into one jar! Plus, there's a lot of alliteration in it, which always makes my tongue tickle! You'll be among the first to know how it turns out. Wish me luck!

Tuesday, September 11, 2012

Tuesday Tips: Too Salty?


I'm a salt addict! When I was younger, I would shake salt on my food until you could actually see the crystals. Nothing was (or is)ever too salty for me! I've improved a bit, but still need to reduce the amount of sodium in my diet due to water retention issues. 


Salt Alternatives (it's a real stretch, if you ask me...) 

(Based on an article from the January 2011 issue of Prevention magazine. I've paraphrased their suggestions and added my own comments in italics.)

Vinegar and lemon juice have the same ability as salt to bring out the flavors of ingredients, while adding an extra twist. The acidity of tomatoes also enhances flavors. Maybe, but not quite like salt...  

Onions and garlic are the quintessential flavor boosters. True, but it's still better with salt.

Herbs and spices jazz up bland food, while adding few (if any) calories. This can be as simple as grinding a bit of fresh black pepper or as fancy as chopping fresh cilantro or basil. Salt would kick it up another notch, though.

Peppers and pepper sauces add heat and give the tongue something to do besides search for salt. But when my tongue searches for salt, it expects to find some.

I'm sorry, but in my mind, "salt alternative" is a paradox. Those two words are mutually exclusive: there is no alternative to salt- not a good one anyway! But I'll keep trying...


Types of Salt

(also according to Prevention magazine)

When you do use salt, you should know that the three main types- table salt, sea salt and kosher salt- all contain nearly the same amount of sodium per ounce, according to Prevention magazine. A few characteristics follow:

Table salt: 
  • refined
  • treated to prevent clumping
  • often iodized
  • least expensive
Sea salt:
  • flavor depends on body of water it's from
  • often milder than table salt
  • usually sold in flakes rather than grains
  • can be very expensive compared to table salt
Kosher salt:
  • larger crystals
  • less processed than table salt
  • costs just a bit more than table salt, so is an inexpensive alternative to sea salt
If you have a favorite salt alternative, or if you're a salt addict like me, tell me about it. If, like my husband, you don't give a hoot about salt, I don't really want to hear from you this time!

Thursday, August 9, 2012

Our Second Favorite Way to Eat Apples in Summer: Apple Salad

Our trip to the grocery store today turned up these 
gorgeous Gala apples (our favorite variety):


This shiny beauty weighs an incredible 13.5 ounces!


Obviously, the very best way to eat these crisp, crunchy apples (which are somehow sweet and tart at the same time) is thinly sliced with the peel still on!

Our second favorite way, and possibly our favorite summer recipe, is the apple salad I created for my husband, who can never get enough apples and eats them every day! Like a lot of my recipes, it's more abstract than specific. I'll leave you to your own proportions and ingredient choices. It's bound to turn out delicious no matter what- so here's the general idea-

Steve's Apple Salad

1. Cut 1 apple per person (depending on hunger level and size of apples) into bite-sized pieces (maybe 1/2" square).
2. Here's the secret ingredient: Toss the apples in a splash of flavored vinegar. This adds flavor to the salad, and keeps the cut apples from browning too quickly.
3. Add Miracle Whip Light until it's as mayonnaise-ey as you like it.
4. Mix in one, some or all of the following: raisins, dried cranberries, sunflower seeds, chopped walnuts, chopped pecans, toasted sliced almonds, or anything else that sounds good to you.

It's so delicious, it could be dessert! 


A Word About Flavored Vinegars


I always keep a selection of flavored vinegars in my pantry for use in salads and marinades. My favorites for Steve's Apple Salad are shown here: Citrus Champagne Vinegar from Sur la Table and Cranberry Pear White Balsamic Vinegar from Oliveto in Roanoke. Only a light-colored vinegar should be chosen for this salad, as a darker dressing will interfere with the beautiful coloring of your fruit.

Friday, June 29, 2012

Devilishly Delicious!


I've been dreaming of deviled eggs ever since I read this post on Kath Eats Real Food.  So I finally made some! I didn't take pictures of my eggs  (because hers look so much better), nor did I take pictures of the process (because she did a great job with that, too). But I will add my two cents worth to the subject: my favorite deviled egg recipe.


Zesty Deviled Eggs


6 hard-cooked eggs
3 tablespoons Miracle Whip Light
2 teaspoons lemon juice
1 teaspoon Worcestershire sauce
1/4 teaspoon dry mustard
dash salt & pepper


1. BOIL EGGS:  Put eggs in saucepan and cover with cold water. Bring water to a boil- then reduce to simmer and start timing about 15 minutes (according to Joy of Cooking). Plunge in cold water immediately after cooking to stop the cooking process and prevent discoloration of yolks.

2. Slice eggs in half lengthwise. Remove yolks.

3. Mash yolks and mix well with other ingredients.

4. Stuff egg whites. Like Kath, I just stuff them with a spoon. I never feel like getting out (and cleaning up) all the pastry decorating paraphernalia just for deviled eggs. Maybe if I were serving them to guests...


My Summer Deviled Eggs


In summer, I like fresh-tasting dishes, and I have a nice little patch of lemon thyme growing in my herb garden. So, for my summer deviled eggs, I mix the yolks with Miracle Whip Light, lemon juice, a handful of lemon thyme, salt and pepper.

I imagine many fresh herbs would be just as good. Experiment a little! Sometimes I make "summer eggs" in winter by substituting dried dill. 


If you don't have an herb garden (or room for one), try container gardening!  All you need is a sunny spot like a windowsill, patio or balcony. 


How do you use your fresh herbs?

Saturday, June 2, 2012

How We Know It's Summer! (And Potato Packet Ideas)

The Old Farmer's Almanac might say that summer officially arrives at 7:09 PM Eastern Daylight Time on June 20, but as far as I'm concerned, it's here! These are the signs that summer began this week:

  • School's out

(Sorry, I couldn't resist... )


  • Mabzie picked the first of many roadside daisies for our Fostoria American vase (a summer tradition since she was old enough to pick them):
  • We fired up our grill today for the first burgers of the season.

The foil pouches on the left are our favorite grilled potato packets. They're my summer version of Potatoes Anna. It started out with a recipe from Southern Living, which I can't seem to find anymore, and has evolved now into more of a technique:

  1. Spray a sheet of aluminum foil with non-stick cooking spray for each serving. 
  2. Place a couple of thin pats of butter on each sheet.
  3. Layer very thinly sliced potatoes (either peeled or not, your choice) in a circular pattern. Place a little more butter on top. Salt and pepper to taste. Add other seasoning or onions if you like. The one above is plain 'cause that's how my husband and daughter like it.
  4. Fold foil into packets as you see on the grill above and cook 30 minutes to 1 hour, depending on how hot your grill gets! Make sure to check that they aren't getting burned on the bottom, and flip over at least once during cooking.
  5. Open packets and chow down!
If you're more comfortable with an actual recipe, I'd urge you to try one of these links. They all sound great!

  • Our little birdie's back! She (or I guess it could be he...) has slept above the column on our front porch for several summers now. I'm not sure of the species because she keeps her head buried in the corner, like you see here. So it's hard to take her picture, but I'm always happy to see her! 

In other bird news, the bird bottle above our back entrance (the one I said no bird family had ever nested in) is now home to another bluebird. I hope that means more babies, since I didn't get to see the others leave the nest!

What signifies summer around your house? I'd love to hear what's happening this week. 

New Favorite Pancake Recipe

Our family's favorite pancake recipe was Bisquick Melt-In-Your-Mouth Pancakes from the back of the box. Years ago, we graduated from straight pancake-mix-pancakes to these upgraded puffy ones. The baking powder and lemon juice makes them much fluffier than a regular mix. And definitely yummy. They had earned a spot in my personal, handwritten, pass down through the generations if anyone cares, guard with your life, save in case of fire, cookbook.


But then, along came Fluffy Pancakes from allrecipes.com. Even better! Mabzie and her thirteen and fourteen year old sleepover friends whipped up a batch on their own. Mabz had been saving the recipe on her ipod, and although our cupboards were nearly bare, we had all the ingredients. This image doesn't do them justice, but you can see how much they rose on the griddle. When you mix the milk and vinegar in the first step, you can actually see the bubbly chemical reaction taking place. The recipe says it makes four pancakes, but they made nine about this size.


Any pancake recipe that uses an acid, like vinegar or lemon juice, along with baking powder, should be extra light and fluffy like these.

Another tip I shared with the girls was how to tell when your griddle is hot enough. Dip your fingertips in water and flick it out onto the warm griddle by quickly opening your hand. If it sizzles, it's ready to make perfect pancakes. If not, it's not hot enough, and your batter will spread out too far, making them too thin.

Finally, I would like to leave you with a link to a page of pancake poems! Enjoy!