Labels

Attic (4) Baking (14) Bird Bottles (3) Books (1) Buttons (2) Challenges (5) Chuckles (3) Cleaning (1) Confessions (6) Cooking (23) Critters (12) Decorating (1) Fabric (3) Fall (5) Freebies (3) Holidays (23) Kitchen (2) Meal Planning (6) Organizing (6) Parenting (2) Pumpkin (5) Quilt Camp (2) Quilt Guild (3) Quilting (11) Rainbows (2) Recipes (14) Saving Money (17) Scrap Bins (3) Sewing (8) Sewing Room (12) Spring (10) Summer (7) Tuesday Tips (14) Tutorials (3) Vacation (8) Winter (1)
Showing posts with label Baking. Show all posts

Sunday, March 10, 2013

Pumpkin Gingerbread


I've posted two sweet bread recipes previously (Cranberry-Pumpkin Bread and Banana Gingerbread), which I would've sworn (and probably did swear) were the best ever! Well, they were good, but this amazing loaf is even better. I'd love to cite the original recipe source, but it's been languishing in my file too long to say where it came from! 


Pumpkin Gingerbread

Batter:
2 cups flour
1/2 cup packed brown sugar
2 teaspoon baking powder
1 teaspoon cinnamon
1/2 teaspoon baking soda
1 cup canned pumpkin
1/2 cup molasses
2 eggs
1/3 cup butter, melted
1/4 cup milk
1 teaspoon ginger

Topping:
1/2 cup chopped walnuts
2 tablespoons sugar

1. Preheat oven to 350  degrees and grease a 9x5x3" loaf pan.
2. In a large bowl, sift together 1 cup of the flour, brown sugar, baking powder, cinnamon and baking soda.
3. Add pumpkin, molasses, eggs, butter, milk and ginger. Blend well.
4.Add remaining flour and beat well to combine.
5. Pour mixture into prepared pan. For topping, mix walnuts and sugar together and sprinkle over batter. 
6. Bake at 350 degrees for one hour, or until wooden pick or cake tester inserted in center of loaf comes out clean.
7. Cool on wire rack. Wrap in plastic wrap for storage. Though I didn't try it yet, this bread should freeze well, too.

My family is so-o-o-o glad I finally tried this one. It's their new favorite- and mine, too! Try it and let me know what you think.


Sunday, January 13, 2013

Replacing Butter with Olive Oil


I've often wondered in what ways butter, oil and shortening are interchangeable (this spelling always looks wrong to me, but it's right) in baking and recipes. The only time I have felt comfortable experimenting is in sauteeing. I still don't know all the answers, but last time I visited Oliveto to taste (any buy) some interesting oils and vinegars I was offered one piece of the puzzle:

Butter to Olive Oil Conversion Chart

Butter/Margarine =   Olive Oil
1 teaspoon               3/4 teaspoon
1 tablespoon            2 1/4 teaspoons
2 tablespoons           1 1/2 tablespoons
1/4 cup                    3 tablespoons
1/3 cup                     1/4 cup
1/2 cup                     1/4 cup + 2 tablespoons
2/3 cup                     1/2 cup
3/4 cup                     1/2 cup + 1 tablespoon
1 cup                           3/4 cup  

I plan to experiment with this a little. I also thought about replacing the vegetable oil in my Cranberry Pumpkin Bread with walnut oil to see how it changes the flavor. (My understanding is that any oil -nut, vegetable, olive, etc.- can be exchanged measure for measure.)

Has anyone tried replacing butter with oil in a recipe? How did it turn out?

Saturday, December 22, 2012

What if You Don't Have Cake Flour? Make Your Own.

The Southern Living Brown Sugar Pound Cake Madeline and I wanted to bake called for three cups of cake flour. Naturally, we didn't have any in our pantry. Nor did we really know what it was. Did it matter? Could we use all-purpose flour instead? We really wanted to make this cake!


What is cake flour?


Well, according to the dictionary, cake flour is a softer flour which is higher in protein, has a higher starch content, and produces a lighter texture in baked goods than all purpose flour.


How to Make Your Own Cake Flour


Some sources suggest that one cup of cake flour is equal to one cup less two tablespoons of all-purpose flour, sifted. That solution seems to address the texture/softness issue, but what about the starch?

The subtitution that made sense to me scientifically (if I should even be using the words me and scientifically in the same sentence) was the following:

For each cup of cake flour needed, remove two tablespoons from one cup of all-purpose flour and replace it with cornstarch. Then sift four or five times for a lighter texture.

It occurs to me now that an easier way might be to put two tablespoons of cornstarch in a dry meauring cup and fill it the rest of the way up with flour.


Does it work?


I won't know how it tastes until it's cut, but the resulting Brown Sugar Pound Cake is pure baking p@rn (and smells delicious):


Look for this post to disappear tomorrow evening if this gorgeous cake tastes like sawdust! If it does, at least there's vanilla ice cream!

The rest of the menu for this Christmas-Eve-Eve dinner with our next-door-neighbors is:

Homemade Maryland-Style Crab Cakes w/ Mustard Sauce
Duchess Potatoes
Creamed Spinach
Corn Pudding
Yeast Rolls (frozen)
Plenty of wine 
and Bellinis (Prosecco and peach puree)


Lots of cream, butter, mayonnaise, sugar and other carbs with a little seafood and a few vegetables thrown in for good measure! We spare no calories for special holiday dinners. There's plenty of time to eat healthy later...

Hope you're able to enjoy your holiday meals without guilt!


Thursday, December 20, 2012

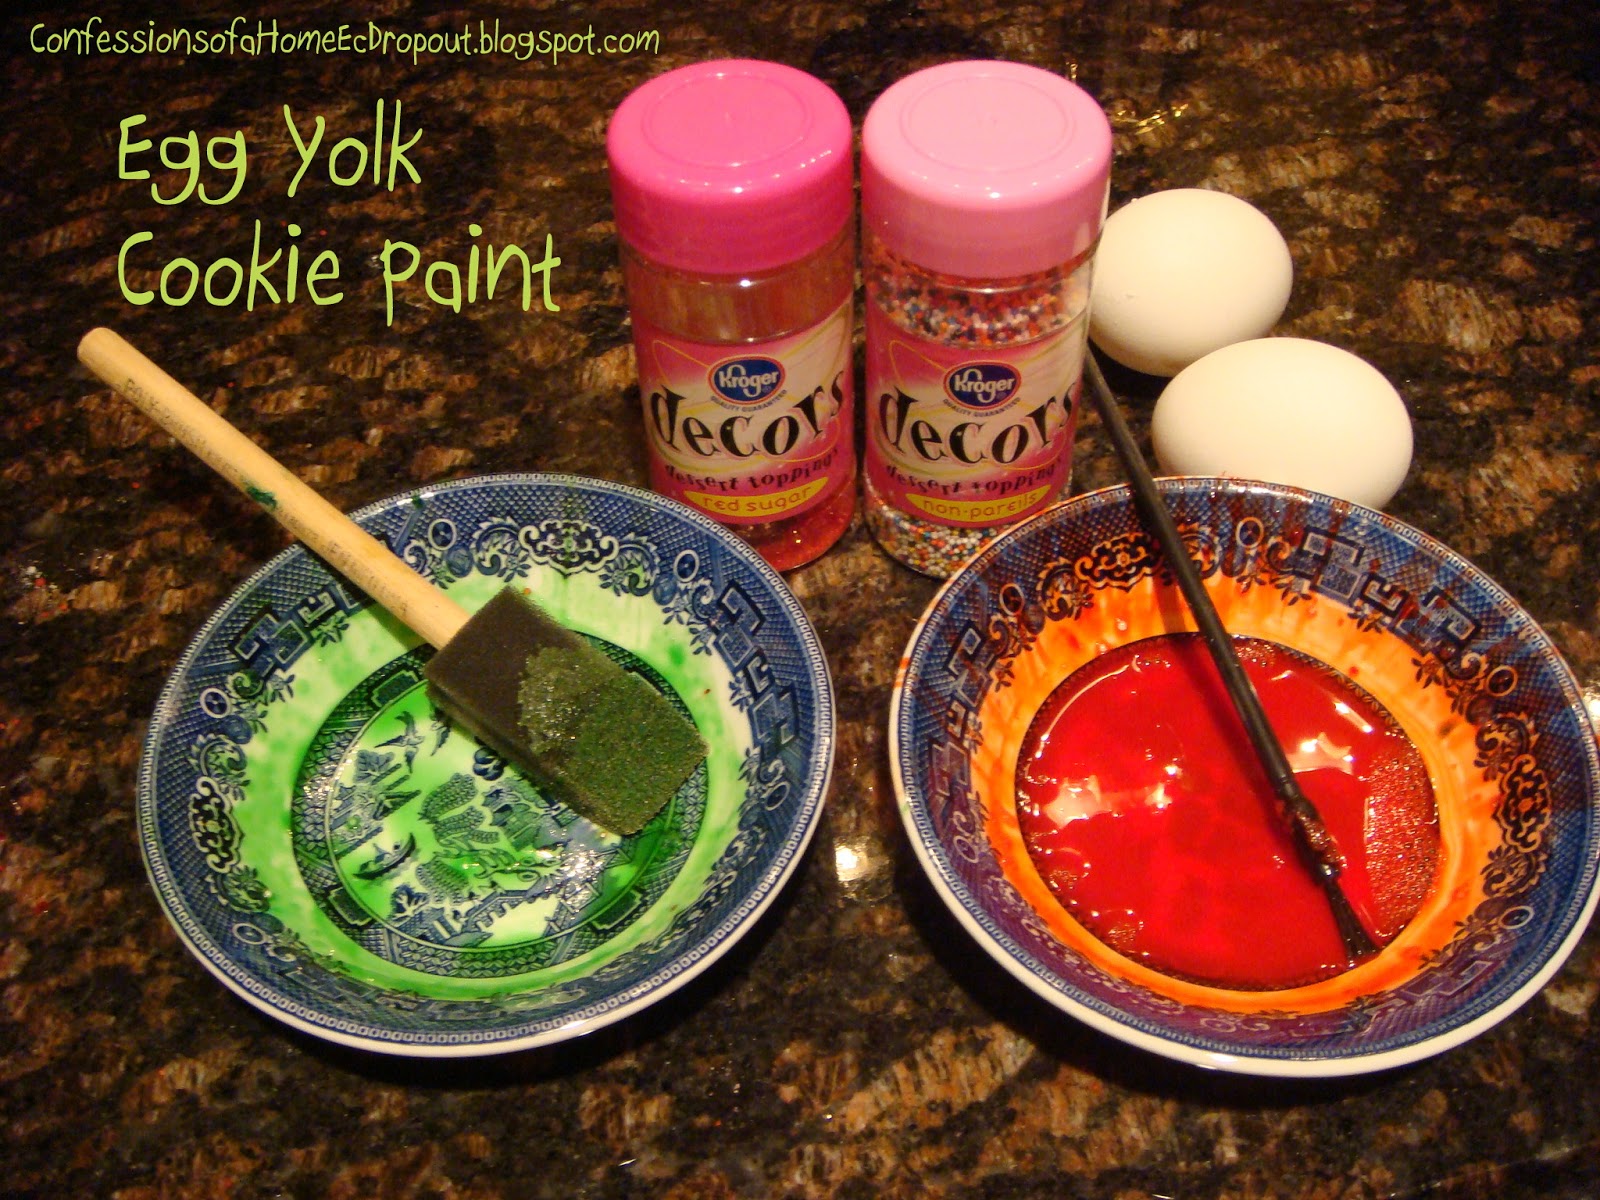
Egg Yolk Cookie Paint


One of our favorite Christmas traditions is baking decorated sugar cookies. Many years ago I learned to make Egg Yolk Cookie Paint, and now it just doesn't seem like Christmas unless we use it on at least one batch. 


How to Make Egg Yolk Cookie Paint


For each color paint, all you do is mix an egg yolk, about a teaspoon of water, and a few drops of food coloring in a small bowl. We only had two colors on hand and the cookies are going to a party at school in the morning, so we had to be creative with just green and red (we usually make yellow for the stars).

Line your  baking sheets with parchment paper to keep cookies from browning too much on the bottom.
Natural Parchment Paper (Google Affiliate Ad)

Just paint the egg wash on the cookies before you bake them. While it's still wet, shake on some sprinkles or colored sugar crystals.

Cool your cookies on wire racks to free up baking sheets sooner!
CHEFS Nonstick Wire Cooling Rack - Medium 15" (Google Affiliate Ad)

After the cookies are baked, the egg-wash turns into a beautifully shiny glaze. And who doesn't love a delicious hand-painted sugar cookie?  

Our batch tonight made 80 cookies cut with various size cutters! I suggested saving some of the dough for later, but Madeline insisted we decorate and bake them all. She tuckered out and went to bed at 9:00...  

Only five days 'til Christmas. Even if you don't feel ready, it's time to slow down and enjoy yourself!


Monday, December 3, 2012

Snickerdoodles

Madeline and I made snickerdooodles for our first Christmas party of the season tomorrow night.


We have tried snickerdoodles with butter and snickerdoodles with shortening. Snickerdoodles with cream of tartar, snickerdoodles with baking powder, and snickerdoodles with both. Lots of snickerdoodle baking and tasting has led us to this recipe. It produces cookies that are little chewy while still warm, and crispy (yet soft and fluffy) once they're cool.

Our Favorite Snickerdoodles
Makes 48

1 cup shortening
1 1/2 cups sugar
2 eggs
1 teaspoon vanilla extract
2 3/4 cups flour
1 teaspoon baking soda
1/2 teaspoon salt
2 teaspoons cream of tartar
extra cinnamon and sugar for coating dough balls (we often add colored sugar)

WET INGREDIENTS:
Cream shortening with electric mixer.
Gradually add sugar, beating well.
Add eggs. Beat well.
Stir in vanilla.

DRY INGREDIENTS:
Sift together flour, baking soda, salt and cream of tartar in a medium mixing bowl.
Add to creamed mixture and mix well.

SHAPING THE COOKIES:

Refrigerate dough, covered in plastic wrap, for about an hour.

Shape dough into 1" balls. (If dough is still too soft and sticky to work with, chill a bit longer.)
Roll balls in cinnamon and sugar and place 2" apart on a lightly greased or parchment paper lined cookie sheets.


Bake at 400 degrees for about 10 minutes, until tops are cracked and lightly browned. Although they may look slightly under-baked when you remove them from the oven, they'll be just right once they cool.


When cookies are set and cool enough to remove from the baking sheets, place on wire racks (if you have them) to cool completely.

HINTS:
Try the shortening that comes in little blocks- much easier to measure, work with, and keep fresh, than the kind in a can.

If you haven't tried parchment paper, please do. It keeps cookies from browning too much on the bottom and prevents sticking.

If you don't have wire racks, get some. They keep cookie bottoms from being soggy.

We also made a batch of our Banana Pepper-Sharp Cheddar Cheese Spread. I'll write about that later!

What do you taking to potluck parties this season?

Friday, November 2, 2012

Julie & Julia


I just finished reading Julie & Julia by Julie Powell. What a departure from the movie, which I thought was absolutely delightful. I'm glad I read it because it offered a more realistic account of her experiences with cooking all 524 recipes from Mastering the Art of French Cooking by Julia Child... in one year! And blogged about it every step of the way !What surprises me now is the casting of the seemingly sweet Amy Adams, who portrayed  Julie as a cute, giggly, adventurous, though slightly skeptical gal! Having read the book, I'm thinking maybe Amy Pohler would've been a better choice. Of course, Meryl Streep was fabulous (even better than Dan Aykroyd) as Julia.

Anyway, I enjoyed both the book and movie, and am completely intrigued and inspired by the Julie/Julia project! However, I'm certainly not up to cooking kidneys, liver, gizzards, or any manner of aspic. And no one in my family would touch that crap with a ten-foot pole, including me.

I was talking to Mabz about this and she said, "Mommy, why don't you bake your way through the Christmas Cookies book?"

Now, that I think I could manage.

What cookbook would you like to cook and eat your way through?

Sunday, October 28, 2012

Pumpkin Carving & Banana Gingerbread

We've always used a drywall saw and a kitchen knife to carve of jack-o-lanterns. They usually turn out cute.

Last year, since a friend recommended it, but mostly because I'm a sucker for any holiday stuff that's marked 75% off, we bought a stencil book and pumpkin carving set for a little less than a buck. The little plastic  utensils looked like they might fall apart or break during the first use, but we figured the stencils alone would be worth what we paid.

I was smart enough to pack it away with the Halloween costumes and decorations, so we actually remembered we had it! Well, the stencils were all a bit big for our pumpkin. So we made our own with white paper and a Sharpie. We notched each corner so it would fit better, and taped it on the pumpkin.


We tried a new technique this year which made the pumpkin easier to handle: carve the facial features first, then cut out the top opening!


I think he's our best ever jack-o-lantern! And our easiest. Those cheap little precision tools actually worked great, didn't break, and did a better job than the stuff we used to grab out of our toolbox! We got much smoother cuts with the little saws, and the tiny plastic "drill" made it easier to get started. The best tool of all was the flat plastic scoop/scraper we used to get the strings, pulp and seeds out of the pumpkin.

And, as a bonus, our orange friend held an abundance of seeds, which are spread out to dry for roasting tomorrow night!

"Don't forget about me... I'm orange, too..."

Milburn didn't like having orange competition, so he tried to get us to let him in through the kitchen window. Notice that his left ear is all torn up- he fights with an orange cat down the street that has only half a tail.


Freezing Bananas to Use in Baking

Madeline made Banana Gingerbread from a recipe I clipped from Better Homes & Gardens years ago. As always, my changes are in italics to make one large loaf rather than three minis.  Pictured here are both my "babies"- my KitchenAid stand mixer is in the background to the left of my daughter. The mixer's been with me a lot longer!


Bread/cake recipes work best with very ripe, brown-spotted bananas. We had some at that stage last Friday when we decided to go out of town for the weekend. So I threw them in the freezer, peel and all. Here's what they looked like when they came out.


You just peel them, let them thaw a bit, and bake with them. You can also peel them first and freeze them in Ziploc bags, but that just seems like an extra step to me. They come in their own packaging, after all.

Banana Gingerbread

Yield/Servings: 3 loaves (I prefer to make 1 large loaf)
Ingredients:
2 1/4 cups all-purpose flour
1/2 cup sugar
1 1/2 to 2 tsp. ground ginger
1 tsp. baking powder
1 tsp. ground cinnamon
1/2 tsp baking soda
1/4 tsp. salt
1 cup mashed ripe bananas (2-3 medium)
1/2 cup butter (sometimes I use 1/4 cup butter and 1/4 cup applesauce- just as good!)
1/2 cup molasses
3 eggs
1/2 cup chopped walnuts or almonds
Directions:
Combine 1 cup of the flour, the sugar, ginger, baking powder, baking soda and salt in a large mixing bowl. Add mashed bananas, butter and molasses. Beat with an electric mixer on low speed until blended, then on high speed for 2 minutes. Add remaining flour and eggs; beat until blended. Stir in nuts.
Divide batter among 3 greased 5 1/2 x 3 x 2-inch loaf pans (or 1 regular-sized loaf pan). Bake at 350 for 40 minutes (about an hour for 1 large loaf) or until a toothpick inserted near the center comes out clean. Cool in pans for 10 minutes on a wire rack. Remove from pans; cool thoroughly on wire rack.

Wrap in plastic wrap when almost cool. Actually tastes better the next day, like most fruit/veggie breads.

Here's hoping Frankenstorm doesn't bring us a blizzard for Halloween! 

Monday, October 8, 2012

Cranberry Pumpkin Bread

As mentioned in a previous post, I had promised my family pumpkin bread. Even they know it doesn't taste any better when baked in a $30 Williams-Sonoma pumpkin motif pan (which I don't own), but I wouldn't have blamed them for thinking that the $16.95 pumpkin-spice bread mix (which I also didn't buy) might have been just a little bit tastier than anything I could whip up on my own. But, as I mentioned, I have a few tried-and-true recipes in the "Fall bread/cake" category, so I pulled one out (changed it a little, embellished it a little), and out came a loaf of Cranberry Pumpkin Bread. Added bonus: Mabz came down the stairs exclaiming how delicious the kitchen smelled!


The original recipe called for two cups of sugar, and that's the way I've made it in the past, which was certainly delicious, but one cup of sugar is 774 calories! So I reduced the sugar to one cup this time, and added some chopped walnuts. We all thought the bread was delicious, but I should have known better than to mention my little sugar experiment... So today I made another full-sugar loaf, and at dinner we had a taste test. My husband chose the lower-sugar version as the better one, and my daughter admitted that she couldn't tell the difference. Ha!

Here's the recipe if you want to try it:

Cranberry Pumpkin Bread
(adapted from Libby's canned pumpkin)
Makes 1 loaf.
2 slightly beaten eggs
1 cups sugar
1/2 vegetable oil
1 cup solid pack pumpkin (not pumpkin pie filling)**
2 1/4 cups flour
1 tablespoon pumpkin pie spice
1 teaspoon baking soda
1/2 teaspoon salt
1 cup chopped cranberries*
1/2 cup chopped walnuts (or pecans)

Pre-heat oven to 350.
Combine eggs, sugar, oil, and pumpkin in a medium-sized mixing bowl. Mix well (with fork or whisk).  
Combine flour, spice, soda and salt in a larger mixing bowl. Make a well in the center.
Pour pumpkin mixture into well and stir just until dry ingredients are moistened.
Stir in cranberries and nuts.
Spoon batter into a greased and floured 9"x5" loaf pan.
Bake at 350 for approximately one hour or until a toothpick inserted into the center comes out clean.

It's best to let it cool in the pan, then wrap the loaf in plastic wrap. It tastes even better the next day. This bread also freezes well, either the whole loaf or slices stored in baggies- great for lunchboxes!

*Cranberries may not be available in your area yet. My family likes cranberry sauce all year 'round, so I buy bags of them in-season to keep in my freezer. They'll last in good condition until the next holiday season.
** I also stock up on canned pumpkin beginning around Halloween, since it's often hard to find throughout the year.

Monday, August 6, 2012

Happy Times Recipe Book

Here's a little something cute from one of my vintage recipe booklets- copyright 1934 by G.F. Corp (Calumet baking powder):

Front Cover
 In case you can't read it, it says: 
"Happy times are here again.
We'll never bake things queer again. 
Let's have cake, the men will cheer again.
Happy times are here again!"

Back Cover
"Times are more sunny
Ma has more money
Eggs still come from a hen
Calumet's itchin'
to get in your kitchen
Let's all eat high again!"

The recipes are also adorably illustrated with a musical theme:


I guess if you didn't live through the Great Depression, you could take a little thing like baking powder for granted! 

Saturday, June 16, 2012

Brownie in a Mug

I think I'm gonna wish I'd never seen this...

Brownie in a Mug at instructables.com (I got there from here- thanks, Amy!)


Why?

a. I love brownies- the fudgier the better!
b. I think I'd eat 'em every day if they didn't take so long and you didn't have to make so many (uh-oh...)
c. I always have the ingredients in my pantry.
d. No equipment to dirty up- all you need is a mug and a fork or whisk.
e. All of the above; I think I'm in big trouble!


If (let's be honest, when) I try this, I'll let you know how it turns out!

Tuesday, June 5, 2012

Tuesday Tips: How to Cut Brownies

Tonight Mabzie and I - OK, mostly Mabzie- baked brownies (I posted my favorite brownie recipe here) and gingerbread bars for our quilt guild picnic tomorrow evening.

I used to cut my brownies with a metal knife, rushing things, as I tend to do, by cutting them as soon as possible after removing them from the oven. Then someone told me to try cutting them with a plastic knife while still warm, but not hot. So I tried letting them cool a bit (a test of my patience) and using one of the little serrated plastic knives like you use at a picnic, or at McDonald's. Guess what? Not only did the brownies look better, but this method eliminated the problem of scratches on my brownie pan. Since then, I have discovered that the hard plastic spatula that came with my mini food chopper works even better! Another common suggestion for easier and neater brownie cutting is using a pizza cutter. I tried that and found it difficult to get the round blade into the edges of the pan.

You'll also notice that I like to cut the edges off because I think they look better on a platter that way. Plus, Mabz loves the edges and eats them right out of the pan!

Other great tips are available around the web:

Here are our treats all wrapped up and ready to go:


The pink you see showing through is polka dot tissue paper. Instead of having seasonal platters, I use this cookie plate, which has a Christmas design etched on the back, all year long! I just change it up with tissue paper, doilies, fabric, or whatever makes it work for the occasion, and nobody knows the difference. Well, I guess they will now... Come to think of it, fabric would've been more appropriate for this picnic, wouldn't it? 


Wednesday, April 25, 2012

Ingredient Substitutions

Have you ever started a recipe and realized halfway through that you didn't have a required ingredient? It's happened to me so often that I now make it a practice to lay everything out on the counter before I start. This is called "mise en place", French for "everything in place". If you're not going use this concept, then you should know about these websites that offer suggestions for ingredient substitution:


A mistake or shortage of ingredients isn't the only reason you might consider a substitution. Sometimes I consider a substitute ingredient when a recipe calls for a very small quantity of something I don't normally stock in my pantry, or to replace an expensive ingredient. I'm very adventurous with substitution in cooking- sometimes out of necessity, and sometimes just for fun! 

I'm more cautious, however, about ingredient changes in baking. Baking results are much more dependent on texture and chemical reaction. The Joy of Baking's recommendations make sense to me, based on what I have learned about baking, but I have seen some resources that I wouldn't trust. 

So, use the "mise en place", a French phrase meaning "everything in place". If you still need a substitution, give one of these lists a try!

Monday, April 2, 2012

Cupcake Calculations

Lots of Moms say it's just as cheap to buy cupcakes as it is to make them, but I always get self-righteous and disagree.


So when Mabzie wanted to take 18 cupcakes to school tomorrow to celebrate her upcoming birthday with her friends, we got our stuff together to bake them:


1 box  Funfetti cake mix (makes 24 cupcakes); $1/Walmart
2 cans Funfetti frosting with sprinkles (13 servings each); $3/Walmart
1/3 cup vegetable oil; $.21/Walmart
3 eggs; $.48/Walmart
cupcake liners ($1.47 for 75); $.48/Walmart
2 pkg Peeps for decoration; $2/Walmart


So I figured 24 cupcakes would cost $7.19, compared with the decorated cupcakes Walmart was selling today for $6 a dozen.  We were going to save almost $5! (For ease of calculations, I didn't consider tax, but I think the rate is lower for groceries than for prepared foods, anyway, which is another post for later...)


The first dozen cupcakes baked beautifully and we were both quite proud. But for the second batch, we only had enough batter to make 7. So a box of mix made only 19- which is OK, still enough! But, I was worried that my math was not going to prove my point at all...


Iced and decorated with sprinkles and Peep bunnies, they were so cute!


Then, guess what?  One can of frosting (13 servings) was plenty for 19 cupcakes!  We can return one can of frosting for $1.50, so our cost ends up being $5.69, or 30 cents per cupcake.


Final analysis:


Walmart cupcakes:  50 cents each
Our cupcakes:         30 cents each
Making cupcakes together:  PRICELESS


In the end, we saved over $6, and we did have enough cupcakes, but the Home Ec Dropout part of me thinks that even if those other Moms are spending twice the money on inferior cupcakes, at least they know how many they are getting!


Monday, March 26, 2012

Chewy Cocoa Brownies from Nestle'

I'm starting you off with the only brownie recipe you'll ever need- straight from the back of the Nestle' Unsweetened Cocoa container. Honestly, that's one of the best places to get a recipe!


Makes 24 delicious brownies, great for dessert, snack or bake sale!


1 2/3 cups granulated sugar
3/4 cup (1 1/2 sticks) butter, melted
2 tablespoons water
2 large eggs
2 teaspoons vanilla extract
1 1/3 cups flour
3/4 cup unsweetened cocoa powder  *not instant cocoa mix*
1/2 teaspoon baking powder
1/4 teaspoon salt
3/4 cup chopped nuts (optional)  *I never put these in*


1. Preheat oven to 350 degrees.
2. Grease 13" x 9" baking pan.
3. Combine sugar, butter and water in large bowl.
4. Stir in eggs and vanilla extract.
5. Combine flour, cocoa, baking powder and salt in medium bowl; stir into sugar mixture.
6. Stir in nuts if desired.
7. Spread into prepared pan.
8. Bake for 18-25 minutes (mine usually take about 20 minutes) or until a toothpick inserted in the center comes out slightly sticky.
9. Cool in pan on wire rack. 

These are almost as easy as a boxed brownie mix! No mixer required- a wooden spoon works just fine.