Labels

Attic (4) Baking (14) Bird Bottles (3) Books (1) Buttons (2) Challenges (5) Chuckles (3) Cleaning (1) Confessions (6) Cooking (23) Critters (12) Decorating (1) Fabric (3) Fall (5) Freebies (3) Holidays (23) Kitchen (2) Meal Planning (6) Organizing (6) Parenting (2) Pumpkin (5) Quilt Camp (2) Quilt Guild (3) Quilting (11) Rainbows (2) Recipes (14) Saving Money (17) Scrap Bins (3) Sewing (8) Sewing Room (12) Spring (10) Summer (7) Tuesday Tips (14) Tutorials (3) Vacation (8) Winter (1)
Showing posts with label Sewing Room. Show all posts

Monday, September 17, 2012

Sewing Room Monday: Productivity

I'm proud to announce that I not only accomplished what I'd planned to last night sewing-wise, but I exceeded everyone's expectations- even my own (which admittedly weren't all that high...)

I mended the sock, fixed the sweater picks and hemmed the pants.

Then I:

  • ironed a pair of Mabzie's capris  that might've been lying around for about two weeks
  • repaired a seam on one of our traveling suitbags (ripped in July)
  • sewed a button on an American Girl sweater (Lord knows how long it waited in the pile)
  • appliqued a fabric heart on an AG t-shirt to cover where another fell off (waited with the sweater)
  • sewed a flannel backing onto part of an old ironing board cover to make an extra pressing surface
  • worked on the travel iron caddy/pressing pad I started at camp in July
  • finished a sewing apron I started a couple of weeks ago (pictured below, the writing is backwards because since it was a mirror shot- I didn't sew it wrong)
So, I guess I showed them... (and surprised myself)!


Fast & Easy Fat Quarter Apron
The tutorial for this apron is in this previous post.  The decorative stitching which divides the pocket really made a difference on this one, don't you think? 


Sunday, September 16, 2012

Sewing Room Sunday: Procrastination

I have a few hours to sew tonight. There are at least a million projects I would love to work on, but I seem to have a backlog of mending projects. One pair of brown socks need darning  (mine), one pink Polo sweater needs a few picks pulled through (Mabz), and one pair of Tommy Bahama pants needs to be hemmed (hubby). My family seems to think I'll go up there tonight and not only not do the mending, or work on one of my many UFO's, but start yet another something new (because that's what I usually do). So I'm going now. Let's see how it turns out, shall we?

Oh, and did I mention that my sewing cottage has been an absolute wreck ever since I returned from quilt camp and I can't find a thing? Well, there's that, too...  

Sunday, September 9, 2012

Sewing Room Sunday: Magic-Fit for Pants

Since I haven't been sewing this week, I thought I'd show you something fun I picked up recently while thrifting:


One thing I really hate is that my favorite shop to scrounge around in for sewing stuff writes the price right on the front of vintage paper items with a Sharpie! Anyway, something called Magic-Fit Master Pattern for Pants has to be worth $2.50, right?

Here's what's inside the envelope: 


pattern pieces for pants of various sizes, instructions, and what I would call a crotch curve (with instruction diagrams printed on it). Apparently, one side is for the front crotch and the other is for the back. Now, that seems like a really useful thing to have around...


I always need some type of adjustment in that area, but have never been able to really figure it out. Maybe this little gadget will help! I already have this hip/armhole curve ruler (below) in my sewing room, which I have used for several garments and other projects. I can't wait to try the crotch curve- but I think it would be great if it was transparent. 


Almost as cool as the crotch curve is this:


It appears to be a template for marking bust darts according to your cup size, which obviously has nothing to do with pants, but was also in the package. How many times have I traced a dart from an old pattern piece? It's so hard to do it accurately. I am so excited about this little bonus!


This kit was copyrighted in 1974, but then fitting pants has been an age-old problem, hasn't it? Perfecting a pair of wool, pleat-front, side-zip pants is on my project list for this winter. In fact, it has been on the list for years. Last year, I even purchased the fabric, pattern, zipper, waistband interfacing, lining- the whole kit'n'kaboodle. I guess has procrastination paid off this time and allowed me a new tool to work with.

I'd love to be posting a pair of pants for you within a few months! Or a few years...

Sunday, August 26, 2012

Sewing Room Sunday: Pearl Buttons!


I've been so anxious to play with the buttons from the jar I posted about a few days ago. As I mentioned, I collect mother-of-pearl buttons and was hoping there were lots of them in this jar! A quart of buttons- which I dumped out on the floor (with permission, of course) at the Williamsburg Antique Mall just to make sure that hadn't put a few nice pearl buttons around the outside and stuck a bunch of cheap, crappy old plastic or new buttons in the middle to trick me into parting with my money. It looked like there were lots of beautiful buttons in there: pearl, celluloid, bakelite, probably even some vegetable ivory, glass, horn and bone. 

So I dumped them all out (I had washed them with mild, soapy water last week, at which time a few disintegrated- obviously not pearls...):


Sorted into two piles, pearl on the left, everything else on the right:


Almost all were old, and almost half were pearl. Don't get me wrong. I don't discriminate. I love all kinds of old buttons. It's just that the pearls are so-o-o-o beautiful. And I love the way they feel. Sometimes when I'm really stressed and getting on my husband's nerves, he will suggest that I "go up to my cottage and run my fingers through my buttons". Works every time!

This button was the prize. Isn't it gorgeous? By the way, many of the buttons still had the aged thread and/or bits of material still attached. Sometimes I remove it, but with this button it just seemed right to leave it on. 


There turned out to be three of these vintage flower buttons. Although not pearl, they are adorable. And I love finding sets! The notched pearl button above actually matches a larger one I already had in my collection. How cool is that?


Someday, I'll show you my pearl button collection, which is now an entire quart Mason jar full, plus many sets still on the cards (complete with great graphics), a special container of sets I've found in different batches I've bought, and an extra special container with my carved and unique mother-of-pearl buttons. Here are two of my favorites:


Then the buttons that aren't pearl need love too, so there are miscellaneous containers for my Granny's colorful buttons, bakelite, bone, plastic, metal, and the ever-growing container of buttons that need identifying.  I don't spend much time on this because it's not really important to me. I just love the buttons!

Heres are links to a few good button articles:


Sunday, July 15, 2012

Sewing Room Sunday: Pink Paisley Scarves

Mabz is at a sleepover tonight, so right after this post I'm heading up to my cottage to address the three yards of silk I brought back from New York's Garment District. I had to buy a yard and a half of each because I like long, rectangular scarves, which are best made along the lengthwise grain.

These are my favorite color (pink) and my favorite pattern (paisley)! My favorite scarf in my drawer right now is also- you guessed it- pink paisley.  Well, three yards of pink paisley ought to make a lot of scarves. So if you are a friend who's due a gift anytime soon, it's probably going to be a scarf. Just let me know your preferred size and shape, and which print you like best:

This one?

Or this one?

Well, off I go to figure out how best to hem the edges. Rolled hem with the serger? Tiny machine hem with turned edges? Handsewn? Lord, I hope it's not handsewn...


Sunday, July 1, 2012

Sewing Room Sunday: My First (Finished) Quilt

The great thing about being a new blogger is that you still haven't seen all my old stuff! I love seeing my friends' first quilts, so I thought you might like to see mine!


In 2004, having dabbled with quilting while never actually making a quilt, I signed up for this "Friendship Star Scrap Quilt" class. What attracted me to it was that each participant was asked to bring a certain number of light squares of a specified size, along with a certain number of smaller dark squares. They were to be packaged in two bundles- one to use in your own quilt and one to trade with someone else in the class. 

I didn't have a stash back then, and had mostly been sewing dresses for Mabzie, who was five at the time. So my scrap packets were populated by small florals and novelty prints in every color imaginable, but I was very excited as I prepared them. I was hooked on scrap quilting before I even started! I'm glad I asked advice from my friend, Kit, who told me that, although the instructions had only specified "cotton fabric", and although corduroy is indeed made of cotton, it does not belong in a quilt.

Imagine the dismay of the poor lady who had to trade scrap sets with me. She had perfectly color-coordinated hers all in beautiful blues! I'm pretty sure she didn't use any of my fabrics, because at the next week's class, when we all brought back our finished quilt tops, hers was all blue. Imagine that! Although very pretty and well constructed, hers looked like a planned quilt and, to me, violated the spirit of the exercise. We were supposed to see how any old scraps put together in the right way can make an appealing quilt! And I did...

Making this quilt was so much fun! The half-square triangles were put on as rectangles, flipped and trimmed. Then everything was put together in strips. I absolutely loved watching the star pattern emerge from the darks and lights. I was totally hooked! Scrap quilts are still my favorites to make and to look at.

Of course, I had no idea how to quilt a quilt, but I did know you had to use batting to make a sandwich. So I put batting between my quilt top and a piece of denim. Then, I machine quilted following the star pattern. I though it looked pretty good, but I started and stopped with backstitching- just like garment sewing- because that's all I knew how to do! I can't really say my machine quilting has improved all that much since then...


I knew you had to bind it, and I knew JoAnn Fabrics sold stuff in packages called bias-binding, so I bought some in brightyellow and sewed it on, front and back, all in one fell swoop. Here's a close-up of the joining... I have learned to do that quite a bit better.


I keep it hanging in my cottage, and I think I always will because it makes me smile every time I look at it, and because it reminds me how far I've come. I'm sure I'll be making fun of my 2012 quilts sometime around 2020!


Do you still have your first quilt?

Sunday, June 24, 2012

Sewing Room Sunday: Vintage-Look Drawer Labels


I made labels for some of my wicker drawers months ago, but didn't get them attached until my recent sewing cottage clean-up. That's so like me! Actually, I had tried to stick them on with glue dots before, which seemed to work fine. But the next day they had fallen off and were all stuck to each other on the floor. 

Here's how I made them:


1. I used Steam-A-Seam 2 to adhere vintage pattern instructions to a piece a card stock. If you follow the instructions on the package, Steam-A-Seam does a much smoother and more permanent job of sticking paper or fabric to card stock than glue or other methods I've tried. (The card stock was actually some ugly art prints that ended up in the "free bin" at my favorite thrift shop.)

2. Then, I cut the desired size tags with a rotary cutter and see-through ruler.

3. The letters were from some scrapbook paper I'd purchased on clearance for $.25/sheet. I just glue-sticked (or would it be glue-stuck?) them on since they're small and won't ripple.

4. Since the glue dots didn't stick to the wicker, Mabzie punch a hole in each one and tied it on with some narrow bias binding we had hanging around in one of the drawers. I though heavy twine would've worked well, but didn't have any. Improvise, improvise, improvise!

I love the vintage feel they give the drawers, and I love knowing what's in which drawer! And as always, I'm thrilled that they cost me very little, and utilized materials we already had.


Friday, June 15, 2012

Clean Sewing Room (Miracle)

My sewing cottage was an unbelievable mess (see before pictures here).

I worked on it for a few hours this week; then Mabz and I spent all day yesterday- and I really mean all day - in there, up to our ears in sewing stuff (and dirt). You see, when your sewing space is not in your actual house, it gets a different kind of dirty. You get mulch and mud tracked in, cobwebs, dust... and you don't clean it as often (not often at all). Not to mention all the thread, fabric fibers and dust that come from your sewing and crafting activities. Well, that's enough explanation (euphemism for excuses). Let's get on with the after pictures (clockwise around the room):
Bins and drawers hold scraps, notions and crafting supplies. To see how I made-over the plastic bins on the second and third shelves, click here.
My new design board started out in life as Mabzie's National History Day project (shown below). It's a wood frame with foam-core panels, which works great. Fabric won't stick to it like flannel, but it's easy to pin into. 
Look what all's hiding behind it (now you know where some of the junk went!). It can also be used as a dressing screen if I'm hemming for a friend, or a student wants to try on a garment! 
Notice my husband's picture near the top center of my bulletin board... Oh, no, wait a minute- that's some gorgeous South American soccer player named Nacho something-or-other, who moonlights as a Ralph Lauren model.
The serger threads got all sucked up in the vacuum cleaner and mangled up and tangled up, so it's time to get out the threading instructions! Honestly, I usually just change colors by tying off to the new spools, loosening the tension, and running the thread through until the color changes! Oh, well... at least my sewing area is neat now.
Below is Mabzie's sewing desk. Now that's it all clean, she's promised to come up and sew with me more! Her design board is a thick foam panel (given to us at Sew Biz Quilt Camp a couple of years ago) covered with tea-dyed muslin.
OK. Let's see how long it stays this way! (Allison, if you're reading this, I didn't find your tote bag pattern.)

Sunday, June 10, 2012

Sewing Room Sunday: One Small, Fast Finish & One Humongous Mess!

There was an orphan quilt block in a bag of free stuff at our Fiber Arts Picnic Tuesday evening. I thought it was cute and felt sorry for it so I brought it home. Usually, I throw "junque" I drag home from different places in a drawer or pin it up on a design board, where it hangs out for years while I "consider" what to do with it! In an effort to mend my ways (and decrease clutter in my cottage), I forced myself to act immediately and make a potholder out of this cute block. A finish within the week has to be some kind of record for me!

I cut up an old ironing board cover to use for the batting (also a clutter-busting move), so it has a heat-reflective layer built in, but it also made it more difficult to quilt. As you can see, I'm a little out of practice on my free motion quilting. I think the whole piece looks cheerfully like a child's art project. The binding is a little crude, but it's a potholder, for heaven's sake! At least it's finished.

Speaking of clutter-busting, my cottage is a huge mess and a major cleaning is underway. These will henceforth be known as the "before" shots (clockwise around the room):


Someone blessed with such a fabulous sewing space should be ashamed to have it look this way. Plus, I can't find anything! I decided to tackle this area first (starting with the seersucker yardage from a previous post). Today, I sorted through what was left in the bins (mostly apparel and backing fabrics) under this sideboard


and spread it out in the backyard to air out in the sun. I thought it bring to mind the pictures you see of the batiks laid out on the ground for processing in Bali, but it turned out looking more like the beginning (or end) of a redneck yard sale (if you live below the Mason-Dixon line you know what I'm talking about):


Tomorrow, what's left gets folded and reorganized in the storage bins. I think two of the four will now be empty. I discarded a lot of what Mabzie calls my "what was Mommy thinking" fabrics. I hope some thrift shop patrons will put them to good use.

A few weeks ago, Sandra blogged about the "Just One Challenge", So thanks to her, "Just One" tiny spot (my pattern drawer) has already been cleaned and organized:


Looks like I've got my work cut out for me, doesn't it? I'll keep you posted (no pun intended).

Have a great week!

Sunday, June 3, 2012

Sewing Room Sunday: Using Up My Seersucker Stash

Before I became a quilter, I sewed a lot of clothes- mostly dresses for my daughter when she was small. I stocked up on more cute seersucker fabric than one little girl could possibly wear. Now, as a teenager, she's not going to wear any seersucker dress that I make, and I'm not really that hot on sewing clothes anymore anyway. So, what to do with the seersucker stash?


It all started when Allison showed up for our usual Thursday night sewing date with some cute fabric and a free pattern she'd picked up at Jo-Ann Fabric for a Market Tote. I'm not sure that pattern is still available, but here are some links to loads of other free ones:


So last night, I got to thinking about making my own market totes. I paired four of my seersucker prints with a large piece of  yellow and white cotton floral, which turned into pieces and parts for not one, but seven, lined market bags! I didn't have quite enough yellow for the linings, so I dug up another piece of pink seersucker for the lining and handles to go with the orange/pink print. I think this'll use up about 10 yards of stash fabric! 


Since my serger is grossly under-used, I can't wait to whip up these little bags. I'm not sure I'll be entirely thrilled with trying to get my "friendly Walmart associate" (NOT!) to load my groceries into these, or even if I would remember to take them with me, or if I even care that much about the plastic bags piling up in the landfill. Actually, I do... we donate ours to Micah's Backpack, an organization that sends easy-to-prepare food home with school kids each weekend. Anyway, if I decide not to use them, I'm sure someone else will love them, and the girly seersucker prints will be OUT of my sewing cottage! WIN-WIN either way!

By the way, I've noticed that blogging has made me comfortable with incomplete sentences (since it's supposed to be conversational), but to be honest, it's scaring me a little!

This has been a fabulous sewing week for me. In addition helping Allison with her market tote, I worked with another friend, Glenda, all day Thursday on a quilt for her expected grand-daughter. We had so much fun we forgot to have lunch! She has quilted a little before, but it's been a long time. So long ago, in fact, that she had never used a rotary cutter! I had so much fun acquainting her with our "new" techniques. She was so thrilled that she didn't have to trace templates and cut them out with scissors. We've come a long way, baby! I'll share Glenda's quilt with you when it's finished.

Wednesday, May 30, 2012

Does Fabric Really Fade in the Sun?


Before one year of sun exposure

This is a little birdie pincushion I made from recycled wool at Sew Biz Quilt Camp last summer. He's been sitting in the window of my sewing cottage for almost a year now. From inside, he looks just fine.


After one year of sun exposure

But the side that's been in the sun looks like this:


Even the rick-rack trim faded! Not to mention the vintage thread spool he's mounted on...


So, why does fabric fade in the sun?


Here are some interesting links:

Teachers answer a student's question at NEWTON.

AnswerBag.com explains how the moisture in fabrics reacts with the atmosphere to create a bleaching effect.

WikiHow shows how to use the process to your advantage with a technique for fading t-shirts to give them a vintage look!

I believe now from first-hand experience that the folks who are advising us to keep our quilts out of the direct sunlight know what they're talking about!

Sunday, May 20, 2012

Sewing Room Sunday: Storage Basket Makeover

View of sewing cottage from back door
Since I usually spend a lot of my weekend in my sewing room (cottage, really, out in the backyard), it makes sense for my Sunday night posts to be about what's going on up there. I say "up there" because it's up the hill a bit.
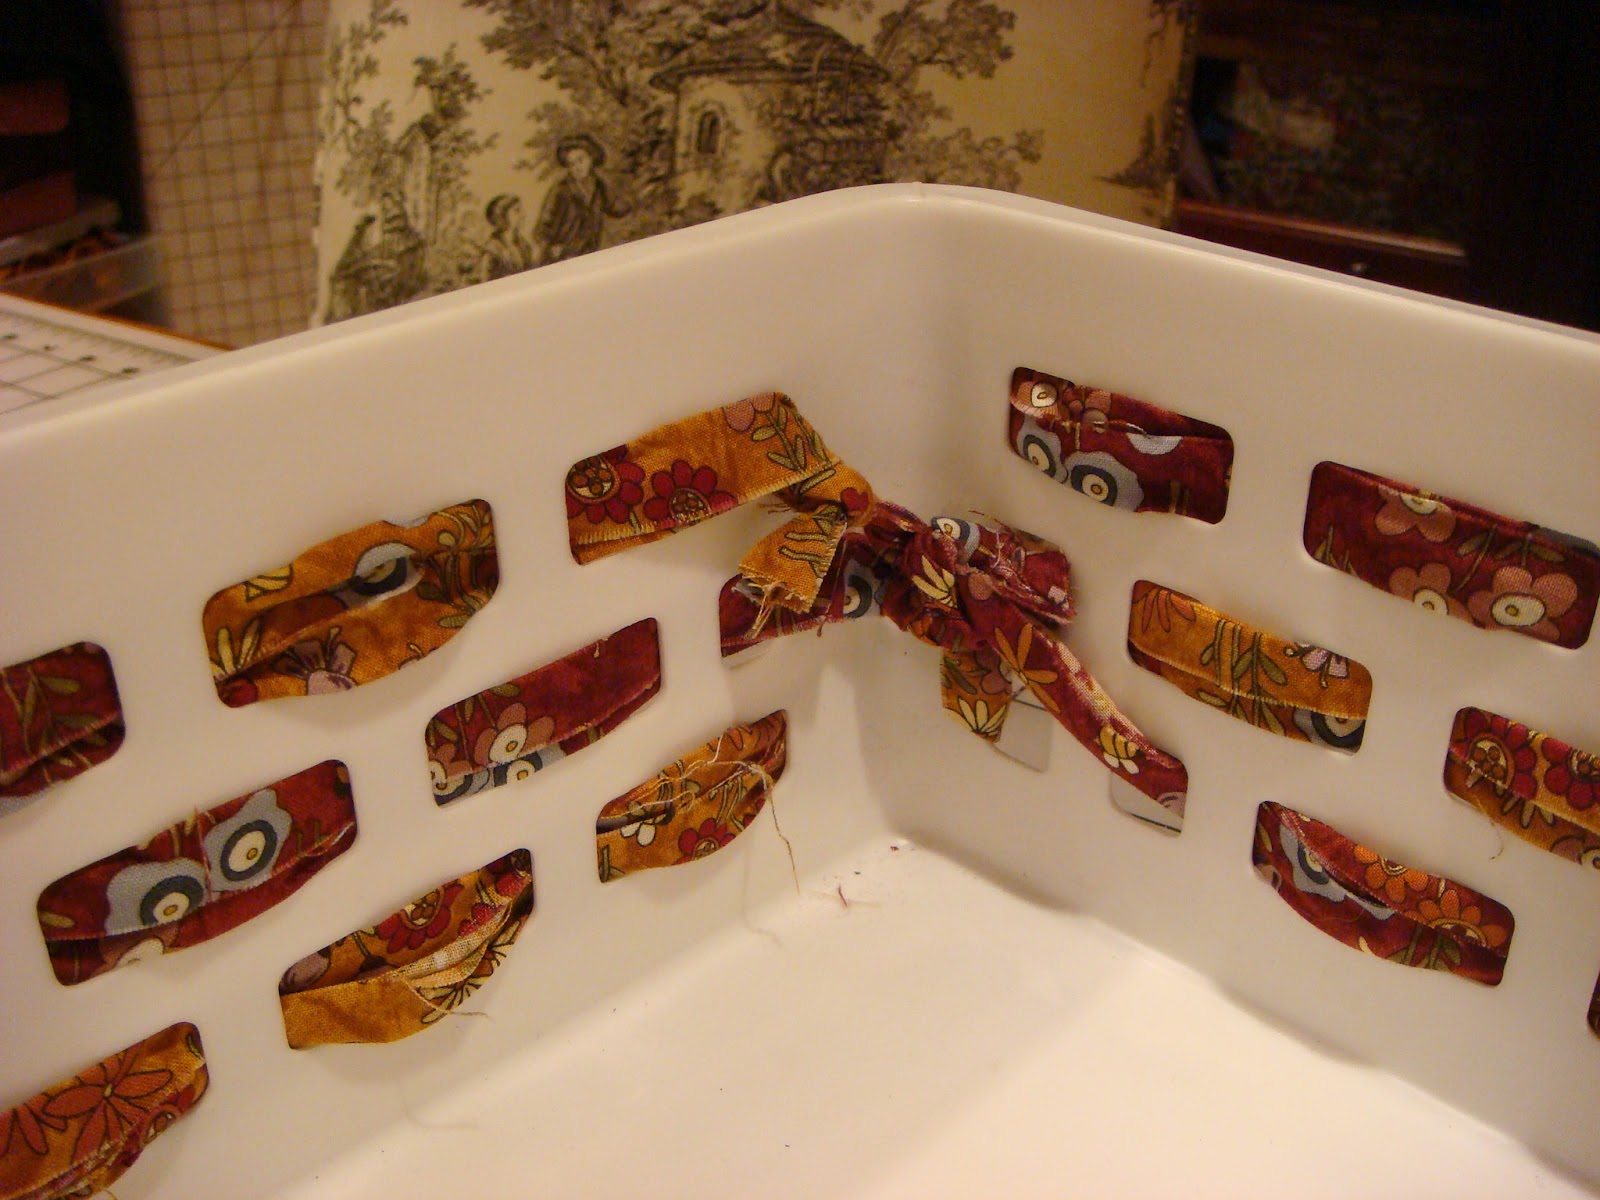
My friend and sewing student, Allison, thought you'd like to see how I dressed up my plain white plastic storage baskets to blend in with my sewing room decor. We had these containers left over when we bought new wicker ones for our bathroom linen closet. They fit nicely on my bookshelves, so I used them plain for awhile, to hold my smaller scraps. But the white really stuck out and bored me. So one night I cut some 2.5" strips from a fabric I had in two different colorways. Then I calculated the strip length required to thread one continuous strip through all three rows of holes. I sewed enough strips together, end to end, for each basket, alternating colors. I angled the seams (out of habit) like you would for quilt binding (instructions here from Heather Bailey's website), but I think a straight seam would've worked just fine.
Inside view of scrap basket
After threading the strip through (top to bottom), making sure the outside corners looked neat, I tied the beginning and end together inside the basket. Not an extremely neat finish, but good enough for the inside of a scrap basket. If you come up with a better idea, please comment! 
There's no before picture, but I think they look pretty good now! I did a larger-size basket (also retired from service in my bathroom) for my daughter's under-sink cabinet some of the colorful organdy ribbons I'd saved from gifts and packaging. These projects used only items we had on hand. I love finding new uses for items we already own!