Friday, December 28, 2012

My New Year's Resolution


My family likes home-cooking. We want to eat food we like that's good for us. We're tired of eating fast food and pizza because I forgot to plan a meal and it's getting late, and we're sick of over-paying for mediocre food served by people who don't deserve the title of "server". We usually eat at home at least five nights a week, but we're definitely in a rut! Meals feel thrown-together and boring.

Our last restaurant meal began with sticky menus and ended with a $30 bill for two gourmet sandwiches with chips, a basket of soggy fries, and a kid's mac and cheese meal. On the way home, I mentioned that I could've made a wide range of delicious home-cooked meals for three (with leftovers) within that price range. As an added benefit, we'd even know what was in it, and under what conditions it was prepared. The next question was: Why aren't we doing it? That's when we decided.

For 2013, we're moving most of our restaurant budget into our grocery budget to upgrade our grocery purchases. Restaurant meals will be reserved for special occasions and when we can't be home for dinner.

A professor-friend touts the 5 P's: Proper Preparation Prevents Poor Performance! I think that's the key to good family dinners. So this week, I'm eagerly digging through my recipes, new and tried-and-true. We're all excited about trying some new ones and revisiting old forgotten favorites, shaking up our dinner routine, and eating better than ever!

I'll share what I'm learning and doing as we go along. Please join me in making 2013 a Year of Meal Planning!

Wednesday, December 26, 2012

The Day After Christmas...

is such a peaceful day at my house! 


I enjoyed cooking big dinners for entertaining on Sunday and Monday, followed by lots of cleaning up! Christmas Day began at 7:30 with the opening of gifts and the dumping out of stockings, followed by a breakfast of Baked French Toast (from a compilation of several recipes found online). Most of the day was spent playing with our "toys", eating candy, and hanging out together- just the three of us- in front of the fireplace. 

We woke up this morning to snow and sleet, which was welcome since we had no plans to leave the house anyway. Today was a great day to catch up on a few projects from our "honey-do" lists. 

This has been the most relaxed and satisfying Christmas I've experienced in a long time. I seem to be learning how to take the pressure off myself (and my family) to make everything perfect, and just to enjoy the moments and memories!   

Monday, December 24, 2012

Tracking Santa


As I clean up from last night's dinner party and prepare for Christmas Eve dinner, we are tracking Santa! This is absolutely Madeline's favorite holiday tradition, and it's the only one that makes me wonder "what did we do before the internet?"! While old-fashioned values are very important to me, I'll be the first to admit that some of these electronic innovations are fun, too!

We'll be tracking Santa all day at Norad Tracks Santa. Santa is somewhere between Australia and Japan right now, and has already delivered over 812 million gifts.

Go Santa! We'll leave out hot chocolate and cookies for ya! (And carrots for the reindeer, too.)

Merry Christmas, Everyone!

Saturday, December 22, 2012

What if You Don't Have Cake Flour? Make Your Own.

The Southern Living Brown Sugar Pound Cake Madeline and I wanted to bake called for three cups of cake flour. Naturally, we didn't have any in our pantry. Nor did we really know what it was. Did it matter? Could we use all-purpose flour instead? We really wanted to make this cake!


What is cake flour?


Well, according to the dictionary, cake flour is a softer flour which is higher in protein, has a higher starch content, and produces a lighter texture in baked goods than all purpose flour.


How to Make Your Own Cake Flour


Some sources suggest that one cup of cake flour is equal to one cup less two tablespoons of all-purpose flour, sifted. That solution seems to address the texture/softness issue, but what about the starch?

The subtitution that made sense to me scientifically (if I should even be using the words me and scientifically in the same sentence) was the following:

For each cup of cake flour needed, remove two tablespoons from one cup of all-purpose flour and replace it with cornstarch. Then sift four or five times for a lighter texture.

It occurs to me now that an easier way might be to put two tablespoons of cornstarch in a dry meauring cup and fill it the rest of the way up with flour.


Does it work?


I won't know how it tastes until it's cut, but the resulting Brown Sugar Pound Cake is pure baking p@rn (and smells delicious):


Look for this post to disappear tomorrow evening if this gorgeous cake tastes like sawdust! If it does, at least there's vanilla ice cream!

The rest of the menu for this Christmas-Eve-Eve dinner with our next-door-neighbors is:

Homemade Maryland-Style Crab Cakes w/ Mustard Sauce
Duchess Potatoes
Creamed Spinach
Corn Pudding
Yeast Rolls (frozen)
Plenty of wine 
and Bellinis (Prosecco and peach puree)


Lots of cream, butter, mayonnaise, sugar and other carbs with a little seafood and a few vegetables thrown in for good measure! We spare no calories for special holiday dinners. There's plenty of time to eat healthy later...

Hope you're able to enjoy your holiday meals without guilt!


Thursday, December 20, 2012

Egg Yolk Cookie Paint


One of our favorite Christmas traditions is baking decorated sugar cookies. Many years ago I learned to make Egg Yolk Cookie Paint, and now it just doesn't seem like Christmas unless we use it on at least one batch. 


How to Make Egg Yolk Cookie Paint


For each color paint, all you do is mix an egg yolk, about a teaspoon of water, and a few drops of food coloring in a small bowl. We only had two colors on hand and the cookies are going to a party at school in the morning, so we had to be creative with just green and red (we usually make yellow for the stars).

Line your  baking sheets with parchment paper to keep cookies from browning too much on the bottom.
Natural Parchment Paper (Google Affiliate Ad)

Just paint the egg wash on the cookies before you bake them. While it's still wet, shake on some sprinkles or colored sugar crystals.

Cool your cookies on wire racks to free up baking sheets sooner!
CHEFS Nonstick Wire Cooling Rack - Medium 15" (Google Affiliate Ad)

After the cookies are baked, the egg-wash turns into a beautifully shiny glaze. And who doesn't love a delicious hand-painted sugar cookie?  

Our batch tonight made 80 cookies cut with various size cutters! I suggested saving some of the dough for later, but Madeline insisted we decorate and bake them all. She tuckered out and went to bed at 9:00...  

Only five days 'til Christmas. Even if you don't feel ready, it's time to slow down and enjoy yourself!


Tuesday, December 18, 2012

Real Family, Fake Tree


I almost didn't post an image of our tree because I was feeling a bit inferior, having spent the last few days looking through Christmas magazines and blogs. Everyone seems to have a "designer tree", one with a theme or color scheme. I thought perhaps no one would be interested in seeing ours, filled with ornaments and memoribalia collected over the years. But guess what? Ours is a 20-year-old artificial tree which sheds a million synthetic needles each time its erected, but still looks good. And ours is a real family that just wants to relax and have fun at Christmastime! 


Our gifts are wrapped with inexpensive mix-and-match (although color coordinated) papers, recycled or homemade ribbons and bows, reclaimed department-store and mail-order tissue papers, gift tags that came free in a Vineyard Vines catalog, and re-used gift bags with the store name covered by stickers!


Since we rarely send out cards anymore, we don't get many. So each year we save a few of our favorites to round out the mantel display. And a few fall off each time the French doors are opened or closed if there's a fire in the fireplace, so they're always in disarray. But they remind us of dear friends and Christmases past.

I would've loved to impress you, but it just doesn't mean that much to me. In the words of Oscar Wilde:


"Be yourself; everyone else is already taken."

I hope you enjoy your holiday in your own special way without feeling obligated to comply with someone else's expectations! 

Monday, December 17, 2012

Christmas Crumb Candle Mat


Last night I really felt like sewing! Pam and I are working on a program for our Quilt Guild called "A New Year's Resolution to Use Our Scraps!". So it made sense to make something using one of the techniques I plan to present. Bonnie Hunter at Quiltville.com gives easy instructions for 3.5" "crumb" blocks. Crumbs are the little bits and pieces that aren't good for anything else (otehrwise known as the stuff most people throw away)! 

I kinda-sorta followed her instructions and made nine from my bin of Christmas scraps. The fun thing about crumb blocks is that when you rotary-cut them to size, your trimmings can be the beginning of the next little block. Now that's using every last bit of fabric.

The musical fabric had landed in the bin by accident, but since music is such an important aspect of our Christmas I put it in- and liked it. In fact, I thought it made the piece "sing". (OK, that was corny...) Then it cried out for musical binding, too!  

Here's the back- also made of scraps:


It was meant to be a potholder, but at 10"x10" it's a bit big. Also a tad too large for a mug mat. Four blocks would've been better for those uses. So it's trying out life as a candle mat on our kitchen table.

If you save "crumbs", maybe it's time you did something with them. Any other ideas?

OK, Now We're Ready...

for Santa! But is he ready for us?


The tree is decorated, the gifts wrapped, the stockings hung. Now all we need is snow!

We keep a little holiday tin full of ornaments hooks and extra fuses and bulbs handy- just in case we get a new ornament or a light goes out!

Hope you're ready, too!

Friday, December 14, 2012

My Favorite Part of Christmas

is decorating the tree! Our family has an eclectic collection of ornaments which always makes me smile. A few of my favorites we've hung so far include:

Old King Cole has been with me since the 60's. His paper eyes fell off, and are now painted on with a Sharpie!
A gift from my college years, painted on a real sand dollar, dated 1983.
I sent in some Snuggle Fabric Softener Sheet labels to get this one, dated 1986. It's a reminder of our "just-starting-out-and-couldn't-afford-ornaments" years.
My Mom gave me this one when I was pregnant- Christmas 1998.

Thanks to whichever Montessori pre-school teacher came up with this idea!

And hats off to me for having Madeline scribble her name and age on the back!  I loved how. when she ran out of room for her name, she jumped up above to continue writing. Soon after, she stopped making backward 4's. I'm so glad I captured that moment in her development.

The Bon Voyage champagne cork from our cruise this summer... 
Decorating the tree is such a trip down memory lane! What's your favorite Christmas tradition? 

Thursday, December 13, 2012

Christmas Decorating Progress

There is none. I hope to report tomorrow that we have at least gotten the Christmas stuff down from the attic! There are two saving graces here: One is that EVERYTHING Christmas related is stored in one place and well-organized; the other is that we only decorate one room plus the front door! Herein lies the advantage to being the Home Ec Dropout instead of, say, Martha Stewart. People don't expect as much fom you!

Gifts have been purchased, though, and the bar remains stocked from Thanksgiving, so all may be well after all!

I did manage to find a little holiday humor for you:


Hope your holiday preparations are going better than mine!

Monday, December 10, 2012

Christmastime is Here...

but we're not ready! We're a little slow getting started around here this year. The tree's not up yet, the gingerbread house isn't made (the kit isn't even bought), no decorations have even been brought down from the attic. But one tradition has begun.


We're listening to our favorite Christmas music- A Charlie Brown Christmas by the Vince Guaraldi Trio!

What's your family's favorite Christmas album?

Thursday, December 6, 2012

Ice Cube Trays: Not Just for Water Anymore!


The broth I made from the carcass of my rum-and-Dr. Pepper marinated Thanksgiving turkey filled 5 quart jars. I froze the remaining broth (after cooling) in the ice cube tray kept in my freezer for small amounts of leftover liquids. Once the tray is full (or almost full), I transfer the cubes to labeled freezer bags for storage. It's a great way to eliminate waste due to spoilage. When you need them, they thaw quickly.


So far, I've also had great luck with freezing:

  • heavy cream or half-and-half (use in sauces or cream soups)
  • fruit juice (use to replace some of the water in gelatin, blend cubes into smoothies, or use to cool fruity drinks)
  • vegetable juice (add flavor to soups or rice)
  • liquid from cooking sweet red peppers in broth (use in soups or rice, or to saute other veggies)


I've also heard you can freeze (and plan to try):
  • fresh herbs blended with a little water
  • leftover wine (if there ever is any...)
  • evaporated milk
  • tomato sauce
  • almost any vegetable puree
  • whole eggs, whites or yolks (with some preparation)
  • leftover coffee (cool iced coffee with cubes, or blend into a frozen drink) 
A standard ice cube tray, by my measurements, holds 2 cups of liquid (16 ounces). If your recipe calls for precise amounts, thaw the cubes first and measure carefully. Approximate cooking conversions follow:

1 cube  = 2 tablespoons = 1 ounce
2 cubes = 1/4 cup
4 cubes = 1/2 cup
6 cubes = 1 cup

Any other ideas?

Monday, December 3, 2012

Snickerdoodles

Madeline and I made snickerdooodles for our first Christmas party of the season tomorrow night.


We have tried snickerdoodles with butter and snickerdoodles with shortening. Snickerdoodles with cream of tartar, snickerdoodles with baking powder, and snickerdoodles with both. Lots of snickerdoodle baking and tasting has led us to this recipe. It produces cookies that are little chewy while still warm, and crispy (yet soft and fluffy) once they're cool.

Our Favorite Snickerdoodles
Makes 48

1 cup shortening
1 1/2 cups sugar
2 eggs
1 teaspoon vanilla extract
2 3/4 cups flour
1 teaspoon baking soda
1/2 teaspoon salt
2 teaspoons cream of tartar
extra cinnamon and sugar for coating dough balls (we often add colored sugar)

WET INGREDIENTS:
Cream shortening with electric mixer.
Gradually add sugar, beating well.
Add eggs. Beat well.
Stir in vanilla.

DRY INGREDIENTS:
Sift together flour, baking soda, salt and cream of tartar in a medium mixing bowl.
Add to creamed mixture and mix well.

SHAPING THE COOKIES:

Refrigerate dough, covered in plastic wrap, for about an hour.

Shape dough into 1" balls. (If dough is still too soft and sticky to work with, chill a bit longer.)
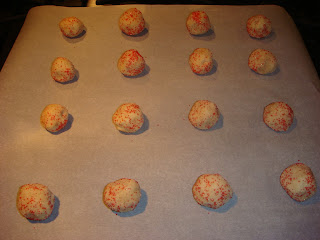
Roll balls in cinnamon and sugar and place 2" apart on a lightly greased or parchment paper lined cookie sheets.


Bake at 400 degrees for about 10 minutes, until tops are cracked and lightly browned. Although they may look slightly under-baked when you remove them from the oven, they'll be just right once they cool.


When cookies are set and cool enough to remove from the baking sheets, place on wire racks (if you have them) to cool completely.

HINTS:
Try the shortening that comes in little blocks- much easier to measure, work with, and keep fresh, than the kind in a can.

If you haven't tried parchment paper, please do. It keeps cookies from browning too much on the bottom and prevents sticking.

If you don't have wire racks, get some. They keep cookie bottoms from being soggy.

We also made a batch of our Banana Pepper-Sharp Cheddar Cheese Spread. I'll write about that later!

What do you taking to potluck parties this season?

Sunday, December 2, 2012

Easy Wine Stopper Makeover

I've have this wine bottle stopper for years. I use it all the time, but never thought it looked quite right. The image of a rural European, thatched-roof cottage wasn't complemented at all by the unfinished wood.


As I was retouching some scuffs on my kitchen cabinets, the solution came to me in the form of a Minwax Wood Finish Mahogany Stain Marker  (Google Affiliate Ad). I could've gotten a can of stain from my husband's cabinet and rubbed it on with a rag, but you know I would've made a mess! Plus, I've learned that if I don't act right away, the project just gets put on The List. And The List is really long! And the stain marker was right there in my hand...


Huge improvement- two minutes max and simple as pie. I love it now! Must drink more wine...

Wednesday, November 28, 2012

Who Knew You Really Needed a Turkey Baster and a Skimmer?


The turkey baster (on the left) is good for - well, you know - basting your turkey. I can't believe I've cooked almost 30 years worth of poultry without one. I guess you can teach an old dog new tricks!

I got mine from WalMart for under 2 bucks, but this one's awfully cute, isn't it?


The skimmer's role at Thanksgiving is not quite as obvious, but no less useful. I grabbed it at the international market because I'd read that it would easily skim (hence the name skimmer) the scum from the turkey broth you make from your Thanksgiving carcass. It did, and without clogging up like the mesh ones I have used before! What a breakthrough... 

I also used my new toy to scoop sweet pepper strips from the saute pan, which is its more intended use, I guess. Much better than the slotted serving spoon I'd been using for jobs like this.


The peppers went into small freezer containers and the cooking broth was frozen into cubes for later use!

What new kitchen gadgets have you recently discovered?


Monday, November 26, 2012

Does Pasture-Raised Turkey Taste Better?

I've always wondered. 


This year I got a chance to compare, since we had the opportunity to eat a pasture-raised turkey on Thanksgving Day followed by our own turkey dinner on Friday. The free-range turkey was delivered fresh and cost over $4 per pound. I think I paid about $1.29 per pound for our frozen Butterball. So this allows us to compare fresh with frozen, as well.

My family said they couldn't detect a significant difference in taste between the two birds. Both were roasted in bags and were incredibly delicious and moist.

So, for over three times the price, the value (in our opinions) would only be in the pleasure or satisfaction you may receive from knowing your turkey's provenance. If how your turkey as treated when it was alive is important to you, or you're worried about what it may have been fed or injected with, then you may feel that a pasture-raised, organic turkey is worth the price differential. However,if taste and budget are your criteria, I say go with the Butterball and use the extra money buy the rest of dinner plus dessert and drinks! 

But if it is important to you to eat locally and you have a strong environmental concerns, by all means follow your conscience. After all, money isn't everything! 

Sunday, November 25, 2012

Does Marinating a Turkey Make a Difference?: My Rum and Dr. Pepper Experiment


Jack's Instructions


My friend Jack's very specific instructions for marinating my 20-pound turkey were as follows:

Mix a fifth of Captain Morgan Original Spiced Rum with a 2-liter bottle of Dr. Pepper and marinate your turkey in it for 12 hours.

Upon further questioning, I was able to extract this additional advice:


Make sure to baste your turkey or it will get too dry as the alcohol burns off.


How I Actually Did It


So I set out to clarify how to marinate a turkey by consulting my other friend, Google, who elaborated enough through a few different sources to help me piece together the marinating process for such a huge piece of poultry.

Here are the basic steps I followed (Google is there for you, too, if you need more information)  Mine turned out well, but I am by no means a detailed recipe writer yet. These instructions would probably be enough for an experienced cook, but may not suffice for a novice! Anyway, it's more than Jack gave me, right?:

1. I mixed together 2 liters of Dr. Pepper and 750 mililiters of Captain Morgan Original Spiced Rum ) less the little bit that accidentally spilled into the glass of ice I had sitting on the counter...) in my large, covered, stainless steel roasting pan. It smelled great already. Tasted good, too.

2. I removed the giblets and neck from the cavities of the turkey (this is important whether you're marinating or not!).

3. I rinsed the turkey, but didn't bother to dry it off, since I was planning to plunge it into a liquid. (I read that you could also marinate the turkey in a cooking bag- similar to the way you marinate chicken breasts in a baggie. One person who did it that way placed it in her crisper drawer to marinate.)

4. I placed the turkey, breast side down, into the marinade, covered the pan, and put it in the fridge for about 12 hours.

5. Then, I turned the turkey over and let it marinate on that side for about 8 hours. Since I had read that marinating time should be 12-36 hours, and I figured the breast was the most important area, I marinated for the last 4 hours on the breast side again. NOTE: Each time I flipped it, I marinated the top side of the turkey, using my new turkey baster- just to try it out!

6. I seasoned the turkey inside and out with salt and pepper, then placed it in a cooking bag like I always do. I poured the marinade into a pitcher and ashed and dried the roasting pan before placing the turkey (in the bag) in it. When I use a bag, I do not place the cover on the pan. In this case, the turkey was too large for the lid anyway! (I have since read that one should rinse the turkey again after marinating, but before cooking. Not sure why...)

7. I set the oven to 325 degrees on convection roast, and the timer for 4.5 hours.

8. Per Jack's instructions, I opened the bag after an hour to baste the turkey with its own juices that were collecting in the bottom of the bag. By then, it was already getting quite brown in some areas, so I placed aluminum foil over a few spots and reclosed the bag. I checked and basted at the second, third and fourth hour marks, too.

9. Once the temperature was right according to the instant-read thermometer, I let it rest out on the counter for 20 minutes before carving (or mutilating, in my case!).


Here's how it turned out. 

The missing pieces were the results of my "taste testing" prior to carving.


I think the meat was moister and a bit sweeter with the marinade than with regular roasting. And you can see it browned a little more than usual. Next time, I would cover it sooner. The one thing I'm not sure about is whether it was actually the marinating or the basting that made the difference! I didn't realize that I was actually changing two variables in this little experiment.


Making a Glaze From Marinade


I wasn't sure it was worth the extra twenty dollars or so for this preparation, until I tasted the glaze I made with the leftover marinade. So deliciously sweet and sticky to drizzle over the turkey like gravy! Today at lunch, I spread some of it cold on my leftover turkey sandwich. It was about the consistency of honey, and every bit as sweet!

I had always heard that liquids used to marinate poultry or meat had to be discarded, but I  really wanted to make a glaze after my husband commented that it would be great if the rum and soda were a sticky glaze! So my friend Google came to my aid once again, convincing me that it is safe to use the marinade, either as a sauce or for "mopping" on the grill if it is boiled first for several minutes. (Please*do*not*take*my*word*on*this, since I am not an expert (quite to the contrary- I'm the Home Ec Dropout... *Do*your*own*research!)

Anyway, I poured the marinade in a 3- quart saucepan (the amount left was about 2 liters), boiled it for about 10 minutes, strained it to remove little bits of icky turkey stuff that had formed, and transferred to a 2-quart saucepan. Then I added a cup of brown sugar and reduced the mixture to between 1 and 2 cups (I didn't measure it) by simmering over low heat. I forgot to time it, but I believe it took at least an hour. It was so delicious, it makes me want to try more reductions- maybe red wine is next!

My daughter said the turkey may not have been that much better, but the sauce was definitely worth twenty dollars! I agree.

Wednesday, November 21, 2012

Thanksgiving Preparations


Our 20-pound turkey has been thawing in the fridge since Sunday. All the ingredients for corn pudding, dressing, and mashed potatoes are in the cupboard. There are fifteen bags of frozen cranberries in my freezer, which should be enough since a batch of my famous homemade Cranberry-Orange Relish only takes two! And I bought a small pumpkin pie, because there's no way I can make one any better, or as economically.  Oh, and Cool Whip, which makes everything taste better!

Then, today, my friend Jack told me about marinating his turkey in Captain Morgan Spiced Rum and Dr. Pepper. It sounded so lip-smacking good that I shopped a little more for those two items, and a turkey baster. The bar is stocked with a veriety of wines (sparkling and regular), spirits and mixers. With all this and a can of Pillsbury crescent rolls on hand, I think you could say I'm ready to cook Thanksgiving dinner for not only three people, but a small Army if one happened to drop in! 

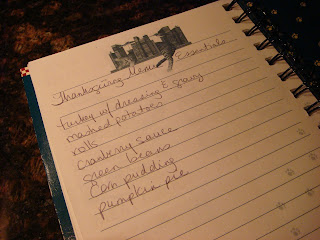
I used to always forget something, until I wised up and wrote a list of Thanksgiving menu essentials (which also happen to be our Christmas dinner essentials) in my Run-Back-Into-The-Burning-House-To-Save-This-Book book of handwritten recipes.


But, there is one thing better than cooking a huge, delicious Thanksgiving dinner with all the trimmings: Eating a huge delicious Thanksgiving dinner in someone else's dining room! Our next-door-neighbors' out-of-town guests had to cancel, so they have invited us to join them and their two adorable daughters tomorrow to share their 20-pound turkey!

I'm still making my homemade cranberry relish and corn pudding as our contribution to the meal. And their kids love sparkling grape juice, so I promised to bring them a bottle of their "beer".

While I was looking forward to our private little family dinner, I am now eagerly anticipating a holiday celebration in a larger family atmosphere. Our friends will get to taste the corn pudding I've eaten every Thanksgiving and Christmas of my life, and I'm sure they will have special dishes or traditions of their own to share with us!

After the big day, I'll share the corn pudding and cranberry relish recipes (with pictures), so you can try them for Christmas (if not before- we eat both all year 'round!).

Happy Thanksgiving to you and yours!

Monday, November 19, 2012

Give Thanksgiving a Chance!


Christmas should not start before Thanksgiving

There. I've said it. 

My favorite home improvement store put out the huge Christmas inflatables before Halloween.
Santa's been at most of the malls for over a week now.
At least half of my neighbors have their Christmas trees up already.
Radio stations have started playing Christmas tunes 24/7.

This isn't really new, and I've learned to accept it, if not embrace it. But now, Black Friday is starting on Thanksgiving Thursday. Enough is enough!

While I love everything about Christmas, I believe that Thanksgiving is quite a wonderful and important holiday, too, and should be given its due respect. All it asks for is one day. Gratitude, food and family- who could ask for more in a holiday?

So, go shopping on Thanksgiving Day if that's what makes you happy. As for me, I'll be relaxing in front of the fire with my husband, daughter and cat, with a glass of wine in my hand.

However you choose to spend Thanksgiving, at least take time to be thankful! You'll still have 39 days between November 23 and December 31 to celebrate Christmas!


Wednesday, November 14, 2012

Why Didn't I Think of That?

The Quirky Quilter, Elaine Myers (read more about her here), always quilts with a pincushion on her wrist  and a piece of batting pinned to her shirt. She says it's a long way around a long-arm quilting machine frame and there's never a trashcan nearby, so she just sticks her stray threads to the batting. 

Why didn't I think of that? Maybe because I just throw everything on the floor, Eleanor Burns style!

Elaine Myers, The Quirky Quilter, with her 3 quilting essentials:  a pincushion on her wrist, batting pinned to her shirt, and a timer for billing clients fairly.

Elaine explains the long-arm quilting process using a model she made from caradboard boxes, mailing tubes and popsicle sticks!

Elaine says professional long-armers want to receive your quilt top, batting and backing separately, not pinned or basted. And they need the batting and backing at least four inches larger all the way around! If you hire someone to quilt for you, check to see what makes it easier for them and gives you the best results.

Friday, November 9, 2012

Anthropologie Inspired Spice Jar and Canister Makeover

I fell in love with these little Chalkboard Spice Jars last time I visited Anthropologie:

$10 - $12 each from anthropologie.com
Which got me thinking about the little jars I use in my spice cabinet to hold extra bulk spices and other odd things that come without decent containers, like baking soda.

I daydreamed for awhile about using chalkboard paint on my jars, but couldn't figure out how to get a cute little label shape just the right size without hand-cutting a stencil, because I'm a little lazy like that. 

Meanwhile, I realized I was bored with the sad and pathetic P-Touch labels I had put on my Blue Willow canisters, too. Would chalkboard paint work on them? 


Before I had time to really mull over the chalkboard-painting and mess-making and buy the supplies, a visit to Staples made it super simple for me (after all, I'm the Home Ec Dropout, not Martha Stewart). Coincidentally, though, the labels I stumbled upon were made by Matha Stewart Home Office with Avery.

My spice jars are not quite as cute as the ones at Anthropologie, but the jars were free (from Better Than Bouoillon chicken base- the labels peel off the top and front very easily) and 48 Kraft paper labels cost $3.99. I just wrote on them with a fine-point Sharpie marker.


And my updated canisters took all of five minutes. The chalkboard labels were 12 for $5.99. I had to cut one in half and recut the bottom edge to shape for the smallest jar, using another sticker as a pattern. 

Staples sells a 4-pack of Martha Stewart chalk for $3.99, which seemed expensive to me. So I wandered over to the art supply area, where I found a box of 12 for $.99. OK, to be fair, the MS chalk already had a little point whittled onto each piece. Big whoop, right?  For three extra dollars? The cheap kind worked just fine!   


So my canisters and extra spice jars have a new look, and I have lots of stickers left over for more projects. If I had done my own painting of the labels, I would've sized them specifically for each jar, but who knows how it would have turned out in the end?

Now if I could just learn how to do that cute lettering the scrapbookers do...

Wednesday, November 7, 2012

Valuable Advice x 2

FIRST:  Do not try to cook pasta shells (for Pumpkin-Ricotta Stuffed Shells) in a smaller pot with less water than usual (or recommended) so that you can do the elbow macaroni for macaroni and cheese in your pasta pot! You get this stuck to the bottom,


a few left intact,


and a bunch of pasta scraps left in your colander!

Actually, it kinda works out if you also accidentally used your 3-quart glass baking dish for the mac and cheese, meaning that the whole set of stuffed shells wouldn't have fit into any of your remaining available baking dishes. So, I guess stuff has a way of working out (at least that's what I'm trying to tell myself).

SECONDLY, although no less importantly:

Never browse Facebook for your old   former (well, maybe I had it right to start with) classmates and friends for the very first time on the exact same day that some smart@*# at AARP has chosen for you to receive this in the mail: 


But, I still think these are the best days of my life. Well, maybe not today...  

How was your day?

Monday, November 5, 2012

Please


Tomorrow.

 If you choose not to, please don't complain about who wins!

Friday, November 2, 2012

Julie & Julia


I just finished reading Julie & Julia by Julie Powell. What a departure from the movie, which I thought was absolutely delightful. I'm glad I read it because it offered a more realistic account of her experiences with cooking all 524 recipes from Mastering the Art of French Cooking by Julia Child... in one year! And blogged about it every step of the way !What surprises me now is the casting of the seemingly sweet Amy Adams, who portrayed  Julie as a cute, giggly, adventurous, though slightly skeptical gal! Having read the book, I'm thinking maybe Amy Pohler would've been a better choice. Of course, Meryl Streep was fabulous (even better than Dan Aykroyd) as Julia.

Anyway, I enjoyed both the book and movie, and am completely intrigued and inspired by the Julie/Julia project! However, I'm certainly not up to cooking kidneys, liver, gizzards, or any manner of aspic. And no one in my family would touch that crap with a ten-foot pole, including me.

I was talking to Mabz about this and she said, "Mommy, why don't you bake your way through the Christmas Cookies book?"

Now, that I think I could manage.

What cookbook would you like to cook and eat your way through?

Tuesday, October 30, 2012

Perfectly Toasted Pumpkin Seeds


Every year I toast the pumpkin seeds from our jack-o-lantern. And every year I don't like the way they turn out- usually burnt. Until this year! I present to you my process, arrived at through much trial and error, for:

Perfectly Toasted Pumpkin Seeds


What you need:
rimmed metal baking sheet or pan
seeds from 1 pumpkin (probably somewhere between 1 and 2 cups)
olive oil
salt

Here's what I did:

1. I did not bother to rinse my pumpkin seeds. I just picked out the really big pieces and left most of the little stringy stuff. As someone else suggested, a little pumpkin goo never hurt anybody, and adds even more flavor. It dries up when you bake the seeds.

2. I read somewhere that it would be a good idea to spread out the seeds in a single layer to dry overnight. So I did. This seemed preferable to boiling the seeds in salty water prior to baking, as another website suggested. Both methods claim to make them easier to eat if you plan to eat the entire seed rather than cracking it open to get just the tender kernel inside.  I really don't think I'd go to all this trouble for a few tiny morsels.

3. When you're ready to roast, toss the seeds with 1 or 2 tablespoons of olive oil (in my failed attempts I used regular vegetable oil) and salt to taste.

4. Place on a greased rimmed metal baking sheet or pan in a single layer.

5. Preheat your oven to 300 degrees and bake until the seeds are lightly browned and fragrant.

For how long, you ask? 
I think this is the important part:

6. Depended on how many seeds you're toasting, how thick or thin your seeds are, how dark your baking pan is, how well your oven is calibrated, how much oil you used, and Lord knows how many other factors, this will probably take between 10 and 30 minutes (some say up to 45). I wouldn't believe any recipe or chef who presumes to give you an exact time. Mine took 20 minutes. About half-way through I took them out, shook the pan, and tasted one to check their progress. When they're done: they smell delicious, appear nicely browned, and taste crispy but are easy to bite into and chew. Sort of like an APGAR score for pumpkin seeds!

I think you can store these in an airtight container for about a week, but you won't need to!

And just to prove I'm a gourmet, the wine pairing for Perfectly Toasted Pumpkin Seeds is Lucky Duck Riesling ($3 a bottle at WalMart).
_______________________________________

CRAZY WEATHER, INDEED

Sandy didn't mess with us much here in the New River Valley, but it's just not right to wake up to snow on the day before Halloween!

Snow on the ground, leaves still on the trees... What the...?