Tuesday, October 30, 2012

Perfectly Toasted Pumpkin Seeds


Every year I toast the pumpkin seeds from our jack-o-lantern. And every year I don't like the way they turn out- usually burnt. Until this year! I present to you my process, arrived at through much trial and error, for:

Perfectly Toasted Pumpkin Seeds


What you need:
rimmed metal baking sheet or pan
seeds from 1 pumpkin (probably somewhere between 1 and 2 cups)
olive oil
salt

Here's what I did:

1. I did not bother to rinse my pumpkin seeds. I just picked out the really big pieces and left most of the little stringy stuff. As someone else suggested, a little pumpkin goo never hurt anybody, and adds even more flavor. It dries up when you bake the seeds.

2. I read somewhere that it would be a good idea to spread out the seeds in a single layer to dry overnight. So I did. This seemed preferable to boiling the seeds in salty water prior to baking, as another website suggested. Both methods claim to make them easier to eat if you plan to eat the entire seed rather than cracking it open to get just the tender kernel inside.  I really don't think I'd go to all this trouble for a few tiny morsels.

3. When you're ready to roast, toss the seeds with 1 or 2 tablespoons of olive oil (in my failed attempts I used regular vegetable oil) and salt to taste.

4. Place on a greased rimmed metal baking sheet or pan in a single layer.

5. Preheat your oven to 300 degrees and bake until the seeds are lightly browned and fragrant.

For how long, you ask? 
I think this is the important part:

6. Depended on how many seeds you're toasting, how thick or thin your seeds are, how dark your baking pan is, how well your oven is calibrated, how much oil you used, and Lord knows how many other factors, this will probably take between 10 and 30 minutes (some say up to 45). I wouldn't believe any recipe or chef who presumes to give you an exact time. Mine took 20 minutes. About half-way through I took them out, shook the pan, and tasted one to check their progress. When they're done: they smell delicious, appear nicely browned, and taste crispy but are easy to bite into and chew. Sort of like an APGAR score for pumpkin seeds!

I think you can store these in an airtight container for about a week, but you won't need to!

And just to prove I'm a gourmet, the wine pairing for Perfectly Toasted Pumpkin Seeds is Lucky Duck Riesling ($3 a bottle at WalMart).
_______________________________________

CRAZY WEATHER, INDEED

Sandy didn't mess with us much here in the New River Valley, but it's just not right to wake up to snow on the day before Halloween!

Snow on the ground, leaves still on the trees... What the...?


Sunday, October 28, 2012

Pumpkin Carving & Banana Gingerbread

We've always used a drywall saw and a kitchen knife to carve of jack-o-lanterns. They usually turn out cute.

Last year, since a friend recommended it, but mostly because I'm a sucker for any holiday stuff that's marked 75% off, we bought a stencil book and pumpkin carving set for a little less than a buck. The little plastic  utensils looked like they might fall apart or break during the first use, but we figured the stencils alone would be worth what we paid.

I was smart enough to pack it away with the Halloween costumes and decorations, so we actually remembered we had it! Well, the stencils were all a bit big for our pumpkin. So we made our own with white paper and a Sharpie. We notched each corner so it would fit better, and taped it on the pumpkin.


We tried a new technique this year which made the pumpkin easier to handle: carve the facial features first, then cut out the top opening!


I think he's our best ever jack-o-lantern! And our easiest. Those cheap little precision tools actually worked great, didn't break, and did a better job than the stuff we used to grab out of our toolbox! We got much smoother cuts with the little saws, and the tiny plastic "drill" made it easier to get started. The best tool of all was the flat plastic scoop/scraper we used to get the strings, pulp and seeds out of the pumpkin.

And, as a bonus, our orange friend held an abundance of seeds, which are spread out to dry for roasting tomorrow night!

"Don't forget about me... I'm orange, too..."

Milburn didn't like having orange competition, so he tried to get us to let him in through the kitchen window. Notice that his left ear is all torn up- he fights with an orange cat down the street that has only half a tail.


Freezing Bananas to Use in Baking

Madeline made Banana Gingerbread from a recipe I clipped from Better Homes & Gardens years ago. As always, my changes are in italics to make one large loaf rather than three minis.  Pictured here are both my "babies"- my KitchenAid stand mixer is in the background to the left of my daughter. The mixer's been with me a lot longer!


Bread/cake recipes work best with very ripe, brown-spotted bananas. We had some at that stage last Friday when we decided to go out of town for the weekend. So I threw them in the freezer, peel and all. Here's what they looked like when they came out.


You just peel them, let them thaw a bit, and bake with them. You can also peel them first and freeze them in Ziploc bags, but that just seems like an extra step to me. They come in their own packaging, after all.

Banana Gingerbread

Yield/Servings: 3 loaves (I prefer to make 1 large loaf)
Ingredients:
2 1/4 cups all-purpose flour
1/2 cup sugar
1 1/2 to 2 tsp. ground ginger
1 tsp. baking powder
1 tsp. ground cinnamon
1/2 tsp baking soda
1/4 tsp. salt
1 cup mashed ripe bananas (2-3 medium)
1/2 cup butter (sometimes I use 1/4 cup butter and 1/4 cup applesauce- just as good!)
1/2 cup molasses
3 eggs
1/2 cup chopped walnuts or almonds
Directions:
Combine 1 cup of the flour, the sugar, ginger, baking powder, baking soda and salt in a large mixing bowl. Add mashed bananas, butter and molasses. Beat with an electric mixer on low speed until blended, then on high speed for 2 minutes. Add remaining flour and eggs; beat until blended. Stir in nuts.
Divide batter among 3 greased 5 1/2 x 3 x 2-inch loaf pans (or 1 regular-sized loaf pan). Bake at 350 for 40 minutes (about an hour for 1 large loaf) or until a toothpick inserted near the center comes out clean. Cool in pans for 10 minutes on a wire rack. Remove from pans; cool thoroughly on wire rack.

Wrap in plastic wrap when almost cool. Actually tastes better the next day, like most fruit/veggie breads.

Here's hoping Frankenstorm doesn't bring us a blizzard for Halloween! 

Tuesday, October 23, 2012

Thrift Shop Treasures

Most Tuesday afternoons around 4:00 (while Mabzie's with her piano teacher), you can find me scrounging around in baskets and bins at the Y Thrift Shop. The stuff I like is small and usually settles down in the bottom.


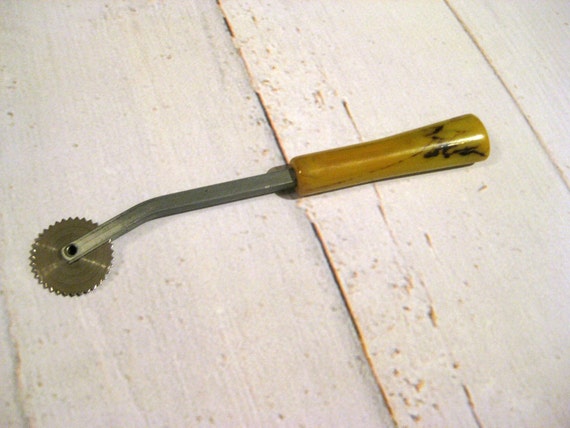
Today's treasures (shown here on a penny rug made by my quilting friend, Sandra) were a few pearl buttons still sewn to a Rainbow card- which I don't have in my collection- and a vintage tracing wheel, the handle of which I was thinking could be bakelite. Upon closer inspection, it seems to have a bit more of a sheen than bakelite, and has no visible scratches. It also failed the bakelite "smell test".  If you're curious, a google search yields numerous good articles on identifying bakelite.

Described on Etsy as Bakelite handle

But, the handle is the same shape, and the metal parts are the same design, as the images from my google search for bakelite tracing wheel. I'm guessing mine is probably a later plastic like lucite, or reproduction bakelite, probably from the 60's rather than the Bakelite era, which was more like the 30's.

How much more aesthetically pleasing is it than the cheap blue plastic tracing wheels we buy today? It even feels better- smoother, more substantial- in your hand. And I'd say I got a bargain, since I paid a whopping 21 cents for the buttons and the wheel. Most of the similar vintage wheels I found online were priced at $10 or more.

I love upgrading my sewing tools, and there's always room for a few more pearl buttons!

What do you always look for when thrifting?

Thursday, October 18, 2012

Pumpkin-Ricotta Stuffed Shells

I discovered this recipe last fall, and was thrilled to share it with my sewing friend, Allison. She looked it over and started asking questions-

Allison: Where did you get fresh basil and sage?
ME: I didn't. I used a few dried herbs from my cabinet.
Allison: Did you get the pecorino Romano from Kroger?
ME: No, I used the Parmesan cheese in the shaker canister.
Allison: I thought Steve didn't like garlic.
ME: He doesn't, so I left it out. But I snuck in a little garlic powder.

You get the idea. So, I am pleased to pass this family favorite along to you, with my adaptations in italics.


Pumpkin-Ricotta Stuffed Shells
Country Living/ October 2011

24 jumbo pasta shells (cook the whole box, they don't all survive intact!
1 tablespoon extra-virgin olive oil (I didn't use this, although it probably keeps them moister)
22 ounces (2 1/2 cups)  fat-free ricotta (my container was a few ounces more, but I used the whole thing)
1 (15 ounce) can pumpkin puree (I have used both puree and solid pack pumpkin, which is easier to find at the store. Both work.
2 1/2 ounces (3/4 cup plus 2 tablespoons)pecorino Romano, grated (I used grated parmesan from the shaker canister)
1 large egg white
2 garlic cloves, minced (I substituted a little garlic powder)
1 cup fresh basil and 1 tablespoon finely chopped fresh sage (I used 1 teaspoon each of dried thyme, basil, parsley and marjoram instead)
1 teaspoon salt
1 teaspoon freshly ground pepper
1 (26 ounce) jar store-bought tomato sauce (I used a 24 ounce can of Hunt's Four Cheese spaghetti sauce)

1. Cook pasta shells according to package instructions; drain. Transfer to a baking sheet and drizzle with oil. Set aside and let cool.
2. Meanwhile, in a medium bowl, stir together ricotta, pumpkin, 3/4 cup of pecorino Romano, and remaining ingredients, except tomato sauce.
3. Preheat oven to 350. Spread sauce in bottom of 9x13" baking dish. Fill each pasta shell with about 3 tablespoons ricotta-pumpkin mixture and arrange in pan. Cover pan with foil and bake for 30 minutes.  Remove foil, sprinkle with remaining pecorino, and bake for 15 minutes more. (If desired, stuff shells the night before and refrigerate overnight in an airtight container, in between layers of plastic wrap; arrange shells on sauce right before baking.) This might be where the drizzle of olive oil would come in handy.

I refrigerate what's left over and microwave future servings as needed. It's just as delicious the second (and third) time around.

If you are intimidated by the idea of stuffing the shells, don't be! I was, too, but if I can do it I know you can. Figure out how 3 tablespoons of filling relates to a 1/4 cup measuring cup, and use that- it's easier than spooning out 3 separate tablespoons each time. Hold the shell in your palm, propping it open with your thumb and forefinger. Fill it with the measuring cup in the other hand. Since my larger container of ricotta makes a bit of extra filling, I am usually able to generously stuff about 28 shells, which is about how many usually don't fall apart before I can get them stuffed. 

For another great pumpkin treat, try my favorite Cranberry-Pumpkin Bread recipe. 

Be on the lookout for my upcoming experiments with Parmesan Pumpkin pasta sauce!


Tuesday, October 16, 2012

Our Favorite Squirrel

You already know we name our wildlife visitors when we can. But, although squirrels are very cute and fun to watch, they usually all look alike. We have regular gray squirrels in the front yard, while the larger, fluffier brownish fox squirrels hang out in the backyard.


White Nose has been with us a few years. I guess you can see how he got his name! The first time I saw him, I thought he had gotten into some white paint!


It's fortunate (and probably not a coincidence) that we have lots of squirrel families here, since we have more than our fair share of nut-producing trees including oak, walnut and hickory. The squirrels use tree stumps as little dining tables to crack and eat their nuts. And they stay busy all day burying and transporting them in preparation for winter.

We have had two other named squirrels in our 16 years here. Short Tail (also named for her physical uniqueness) would come up the tree right next to our patio to ask for bread. Fall Down Squirrel would just topple over and roll around on the ground a lot. We're not sure whether there was something wrong with him or he was just an entertainer, but he was only here for one year.

Thanks for all your help clearing away our nuts, White Nose and friends. You are definitely welcome here!


Monday, October 15, 2012

Meeting the Queen

Today, I met the Queen.


Not that Queen, silly. She's in England. The Queen of Scrap Quilting, Bonnie Hunter of Quiltville.com!


Bonnie spoke this morning to the Old Church Gallery Quilters Guild in Floyd. Her quilts are my absolute favorites! My first quilting class (and finished quilt) was a Scrappy Friendship Star (click here to see it), and right then and there I was hooked. If you Google scrap quilts it doesn't take long to find Bonnie's website.Bonnie's website. Once you're there, it takes hours to break yourself away from it! I was (and still am) spellbound by her simple patterns for beautiful quilts using almost all scraps.

Since I am a starter rather than a finisher, I have many Bonnie quilts in different stages of progress, and many scraps cut into the right sizes and ready to be turned into something I hope can be even half as beautiful as her quilts.


Bonnie is just a cute in person as she is on her blog. She strongly advocated using right down to the last inch-and-a half square of every fabric in your stash, and showed us how to do it! My favorite quote from today's lecture: "If it's still ugly, you just didn't cut it small enough". Yep, Bonnie's a girl after my own heart. Matchy-matchy just doesn't excite me! Give me a pile of scraps and all the memories that come along with them. To me, that's what gives a quilt character!

Just when I thought the day couldn't get any better, I got to have lunch with my friend, Camelia, and eat my favorite sandwich in the world- grilled tuna on rye at Blue Ridge Restaurant. As if that wasn't enough, we topped off a perfect day with a visit to Schoolhouse Fabrics, which really is, as it says on their sign, "A Sewing Paradise".


Thanks, Old Church Gallery Quilters, Bonnie, and Camelia for a lovely day!

Saturday, October 13, 2012

On Top of the World

Have you ever wondered why they call them the Blue Ridge Mountains?


This view from the front deck (can you believe it?) of a mountain getaway cabin in Meadows of Dan, VA answers that question. Just look at where the mountains in the distance meet the skyline- so blue. From up there, I felt like I could see forever.

I'm imagining this view at sunrise (the house faces east)... in the snow... on the Fourth of July...with fog settling in the valley... on a starry night...during a rainstorm ... how could it ever be anything but gorgeous? Yes, the homeowners built floor-to-ceiling windows to enjoy it without leaving the comfort of the sofa or the warmth of the fireplace!

Well, I guess a girl can dream, can't she?

Friday, October 12, 2012

Leftovers is NOT a Dirty Word!

Back in April, I got on a rant about food waste and promised (or threatened, depending on how you look at it) to elaborate, but never quite got back to it. One tip in that post was to make use of all of your leftovers. Just like your fabric scraps cost the same $9-$10 a yard that the uncut yardage in your stash did, the leftovers in your fridge were once fresh groceries for which you paid your hard-earned money.

My sewing friend Lois mentioned once that her son-in-law "doesn't eat leftovers". I can't imagine anyone being so spoiled that they wouldn't eat leftovers. Dr. Phil wasn't on TV when I was dating, but he has said on his show that it's OK to have a list of a few traits that would be deal-breakers for you when choosing a mate. A sports nut, maybe I could handle. A smoker would only be allowed to smoke outside. A tobacco chewer would probably get on the no-list. But the guy who refused to eat leftovers would definitely not have been husband material for me (and wouldn't have wanted to be, I'm sure)!

Many nights in my house, if you don't eat leftovers, you don't eat! But no one minds, and I'm convinced that it helps us keep our grocery budget reasonable. In fact, I'm one of those people who plans leftovers. Last night's dinner almost finished up our pot of homemade clam chowder, so I scheduled one of my "cooking nights". That's when I put on some music and my apron and spend a few hours preparing several dishes to serve over the next few days. Here's what I made (all these items last several days in the fridge, if stored properly):


  • Parmesan couscous from a boxed mix for Mabz to take in her lunch today and tomorrow, since her new braces made her teeth sore.
  • A delicious stir-fry full of colorful veggies:


My sister shared a great stir-fry recipe with me once, which I have used for years. For this one, I used my new, original, top-secret stir-fry recipe, which is much easier and tastes even better! Since you're such good friends, I'll let you in on my "secret".

Buy two 56-ounce bags of Birds Eye stir fry mix- one Thai and one Oriental (because there are slightly different veggies in each, and different sauces). Pour half of each bag into a stir-fry pan and prepare as directed. Choose one of the sauces (I used the soy-ginger from the Thai bag) and add it in. Fabulous!
  • A big pot of rice for the stir-fry and other uses throughout the week.
All this gets placed in the fridge in clear glass storage containers with plastic lids. I don't mark them with dates because I don't seem to have a problem remembering when they were prepared. But it's probably advisable to do that just to be safe.

Now, for this planned leftovers concept to work for you, it's not enough just to prepare the dishes. You have to make sure that your family actually ends up eating what you have stuck in the fridge.

We have dinner rules, one of which is that we all eat together at the kitchen table every night. However, we are not required to all be eating the same thing, and often don't. Tonight, I ate stir-fry while Steve and Mabz had mac & cheese. Sometimes, all three of us may be eating something different. Other nights, I prepare something fresh that we all like. Sometimes, one night's main dish becomes the next night's side dish Sometimes it becomes the next day's lunch. You just have to keep an eye on what's in the fridge, and make sure it gets eaten before it spoils.

My hair-stylist prepares a fresh, interesting, and often elaborate meal every night for his elderly mother and himself. I asked if they ever have leftovers. He said, "Always, and I always put them in a container in the fridge, but we never eat them." If this is you, think about making good use of your leftovers. You work hard to buy food, and to prepare it. Don't throw away your money!

If planned leftovers aren't really your style, I found a meal-planning strategy on a quilting friend's blog that I plan to share with you. I've done a lot of research on meal planning, and tried lots of different methods, but Katherine's is so unique, yet so simple...  Stay tuned for those links in my next post.

Do you and your family like leftovers? 


Tuesday, October 9, 2012

My Husband Shaves His...

Robe!


Bothered by unsightly pills on the sleeves of his favorite winter wool robe (we call it his Emperor Robe because it's so luxurious and he looks so handsome in it), Mr. Fix-It decided to try using his electric razor to remove them. Guess what, it worked! Quite well, I might add. I'm going to try it on a couple of my well-worn sweaters next. 

Now that I think about it, it is a bit reminiscent of a little gadget I bought back in the 80's for shaving sweaters. Only that little sweater-shaver didn't stick around long- as I remember it didn't work well at all. 

We don't call him "MacGyver" around here for nothin'!

Monday, October 8, 2012

Cranberry Pumpkin Bread

As mentioned in a previous post, I had promised my family pumpkin bread. Even they know it doesn't taste any better when baked in a $30 Williams-Sonoma pumpkin motif pan (which I don't own), but I wouldn't have blamed them for thinking that the $16.95 pumpkin-spice bread mix (which I also didn't buy) might have been just a little bit tastier than anything I could whip up on my own. But, as I mentioned, I have a few tried-and-true recipes in the "Fall bread/cake" category, so I pulled one out (changed it a little, embellished it a little), and out came a loaf of Cranberry Pumpkin Bread. Added bonus: Mabz came down the stairs exclaiming how delicious the kitchen smelled!


The original recipe called for two cups of sugar, and that's the way I've made it in the past, which was certainly delicious, but one cup of sugar is 774 calories! So I reduced the sugar to one cup this time, and added some chopped walnuts. We all thought the bread was delicious, but I should have known better than to mention my little sugar experiment... So today I made another full-sugar loaf, and at dinner we had a taste test. My husband chose the lower-sugar version as the better one, and my daughter admitted that she couldn't tell the difference. Ha!

Here's the recipe if you want to try it:

Cranberry Pumpkin Bread
(adapted from Libby's canned pumpkin)
Makes 1 loaf.
2 slightly beaten eggs
1 cups sugar
1/2 vegetable oil
1 cup solid pack pumpkin (not pumpkin pie filling)**
2 1/4 cups flour
1 tablespoon pumpkin pie spice
1 teaspoon baking soda
1/2 teaspoon salt
1 cup chopped cranberries*
1/2 cup chopped walnuts (or pecans)

Pre-heat oven to 350.
Combine eggs, sugar, oil, and pumpkin in a medium-sized mixing bowl. Mix well (with fork or whisk).  
Combine flour, spice, soda and salt in a larger mixing bowl. Make a well in the center.
Pour pumpkin mixture into well and stir just until dry ingredients are moistened.
Stir in cranberries and nuts.
Spoon batter into a greased and floured 9"x5" loaf pan.
Bake at 350 for approximately one hour or until a toothpick inserted into the center comes out clean.

It's best to let it cool in the pan, then wrap the loaf in plastic wrap. It tastes even better the next day. This bread also freezes well, either the whole loaf or slices stored in baggies- great for lunchboxes!

*Cranberries may not be available in your area yet. My family likes cranberry sauce all year 'round, so I buy bags of them in-season to keep in my freezer. They'll last in good condition until the next holiday season.
** I also stock up on canned pumpkin beginning around Halloween, since it's often hard to find throughout the year.

Thursday, October 4, 2012

Good Signs (and Good Food)

On an afternoon outing with my husband, I saw something that made me say, "well, it's about time." In the tiny one-stoplight town of Floyd VA, two of my favorite establishments displayed this sign in their windows:


Thank you, Blue Ridge Restaurant (home of my favorite grilled tuna sandwich) and Floyd Country Store (home of nostalgic penny candy and bluegrass music) for welcoming moms, their breasts and their babies instead of giving them dirty looks.

If you are a business owner, please consider registering with BreastFedBabies.org and displaying their welcome signs. If you're a breastfeeding mom, or have ever been one, thank these merchants for their hospitality.

Then, on the way out of town, I stopped at a quaint Amish (or Mennonite) bakery called the Bread Basket. It turns out that they sell not only baked goods, but bulk foods and deli items as well. I might add that their prices are really reasonable, too.


For $12.73, I got a pound of banana chips, a pound of yogurt raisins, a pound and a half of seasoned bread crumbs, an 8 ounce jar of hot pepper jelly and a bag of cinnamon sticks. I'm pretty sure I purchased each item for considerably less than what I pay at WalMart, and certainly less than at the regular grocery store.

That's where I got my second good sign of the day, which I feel may have actually been put up there just for me to see:


On that note, I think I'll shut down my computer for the night and go spend some time with my hubby.


Tuesday, October 2, 2012

Cutest Baby Idea Ever

I hadn't planned on posting tonight, but I just ran across the most adorable baby idea!


We chose not to learn the gender when we were expecting (it was a girl- she's 13 now!) and I really loved not knowing. There are so few surprises in life. But Holly at Life as a Thrifter came up with a clever way of revealing the ultrasound results to her entire family at the same time, in such a celebratory manner! Read all about her Gender Party here. Kinda makes you want to have another baby just to do that, doesn't it? Uh, maybe not... but it's still the cutest idea I've seen lately.

Monday, October 1, 2012

Autumn Colors, Peppers & Cooking with Pumpkin

Autumn Colors

The first sign of fall in our yard is always the beautiful color of my favorite sugar maple:


The burning bushes are also turning red:


And there are acorns... EVERYWHERE!


Colorful Mini Peppers

 Our favorite thing in the fridge this week is these tiny colorful (and tasty) peppers we found at the grocery store:


Green bell peppers are always around, but I love these little red, yellow and orange ones. So far, we've eaten them sliced in rings and dipped in ranch dressing, diced in salads, chopped up in egg salad, and stir-fried along with a bag of frozen veggie mix. So delicious! Read a little more about peppers here at The City Cook.

Cooking With Pumpkin

We stocked up on canned of pumpkin, too, as we always do this time of year. One of my favorite recipes for fall is Pumpkin Stuffed Shells, which I'll share later this month.

While browsing the Williams-Sonoma store in Colonial Williamsburg last weekend, my husband picked up a little $12 bag of pumpkin spice bread mix and asked, "why don't you get us this? We love pumpkin bread." Well, I love it, too, but I'm not paying that much for it! I think you even had to add some ingredients. So I promised to make some from one of my tried-and-true recipes as soon as I had a chance to buy some pumpkin. Now I have the pumpkin, so I have to make good on my promise. Stay tuned for an upcoming recipe.

Also, a jar of Pumpkin Parmesan Pasta Sauce caught my eye. I was the only one who thought it sounded good, but I thought $16.95 for a pint of sauce was a little steep. So I'm standing there reading the label, trying to figure out how to make some myself. Steve, in typical Steve-fashion, expressed his opinion that I would never be able to duplicate it, so I might as well just buy it. In typical me-fashion, I took that as "permission" to spend $16.95 on a jar of pasta sauce, and rationalized that once I tasted it, and had the ingredient list on the back of the jar, I could make a reasonable facsimile and eat it all the time for just a fraction of that cost. So now I'm kind of committed to coming up with a recipe for my own Pumpkin Parmesan Pasta Sauce. That is, if it actually tastes good... but how could it not... pumpkin... parmesan... pasta... sauce. Everything yummy all rolled into one jar! Plus, there's a lot of alliteration in it, which always makes my tongue tickle! You'll be among the first to know how it turns out. Wish me luck!